Ever try to execute a file and nothing happens? Often defining file permissions, the Access Control List, is what is at work here. You may have tried to use scripts that are not set to your ownership, or perhaps have trouble setting the ability to execute it under your user. This is all covered under ACL. These are just a few examples of how Access Control List may affect you in a Linux environment. If you are interested in learning how to use Window Managers like i3, scripting is essential. You would need one for something seemingly simple like shutting down your system using a key combination.
Today, we will dive into the meat of how ACL works, from the conception of a file to changing access control after the fact. Every file in your system is either under your control or root control. Root is a high control position to be respected, as you will have the ability to build up your system or destroy it. Every file you make in an editor or create using the touch command likely will have your user permissions. This can affect software you have installed. This is the case with MOCP. My goal was to change the theme on a permanent bases rather than having to hit T. Turns out only a root controlled config file would work for the very reason we are speaking about today.
INSTALL
To be able to use ACL with ease, we will install ACL. It is that simple. We will demonstrate how to install ACL on Arch, Debian, openSUSE, RHEL systems and any distributions based on them.
ARCH
sudo pacman -S acl
DEBIAN
sudo apt install acl
openSUSE
sudo zypper install acl
RHEL
sudo yum install acl
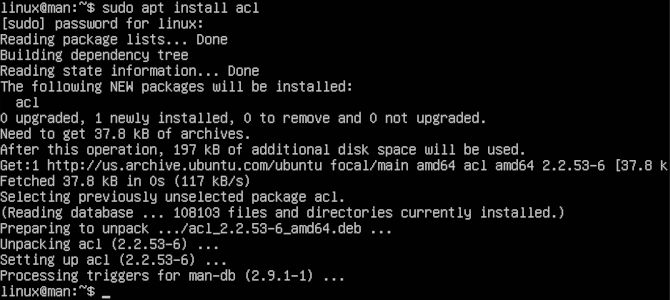
This way, if ACL is not included in your system for whatever reason, it is now. Next, we will need to see what our partitions are named to mount our system with the ACL option. To achieve this, we will use the lsblk command.
lsblk
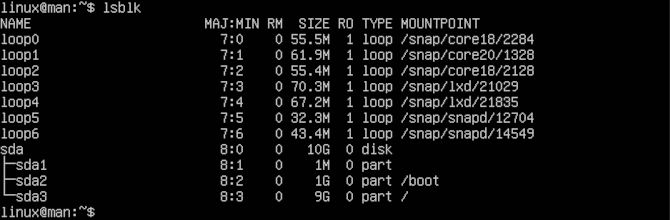
Look for the partition that contains your root or home partition, if you have one. Then use that in place of sdx. It may be something like sda2 or sda3.
sudo mount -o remount -o acl /dev/sdx
You have the option of making this change permanent. Currently, at this stage, you will lose ACL mount after reboot. You DO NOT need to make this permanent to run through the rest of the commands starting in the next section. This is up to you, as you may be fine with how your system functions in its current state. Let’s see an example of what it may look like to use ACL in your fstab.
sudo vim /etc/fstab
Then you will be able to edit the file by typing a. This will insert text after the courser.
a
Always make sure to copy your current fstab line that contains your root or home partition if you have one. Then use a # at the front of the line to comment it out. This way we can save it in the file, just in case something goes wrong. We will make sure to add a comma and acl after “errors=remount-ro” to edit the uncommented line.
					#/dev/sdx /               ext4    errors=remount-ro 0       1
/dev/sdx /               ext4    errors=remount-ro,acl 0       1
Now we will save and close Vim. First, we type Esc to stop editing.
Esc
Then you can save changes and close the text document by typing ZZ. Alternatively, you can use :q! to quit without saving.
ZZ
Know that you can really mess up the way your user loads if you make any mistakes here. Make sure you don’t just paste this in exactly. You will have very different results. This is because your partitions may be different. You may even have a UUID hash instead of the partition. If you get into trouble, and you can no longer boot to your user, try reboot by typing Ctrl Alt Delete, during grub reboot, hit any key. Add init=/bin/bash and press enter.
init=/bin/bash
This should give you a terminal to work with. Next, you will need to add back your original fstab line that we commented out for safety. We need to mount root so that we can do this.
mount -o remount,rw /
Now that we are mounted to root, we will want to edit the fstab.
vim /etc/fstab
Then you will be able to edit the file by typing a. This will insert text after the courser.
a
Now we can uncomment our original line. Then comment out the line that you edited for another try later to delete it.
					/dev/sdx /               ext4    errors=remount-ro 0       1
#/dev/sdx /               ext4    errors=remount-ro,acl 0       1
Now we will save and close Vim. First, we type Esc to stop editing.
Esc
Then you can save changes and close the text document by typing ZZ. Alternatively, you can use :q! to quit without saving.
ZZ
BASIC DEFAULTS
Now that we have use of acl in our system, we can start using the commands to see what is going on. Let’s make some test files to work. We will be making a directory as root and as your regular user to demonstrate what defaults look like.
sudo mkdir root-test && cd root-test && sudo touch root-test.txt && cd && mkdir user-test && cd user-test && touch user-test.txt && cd
Now let’s see what we can learn about these new files we just created.
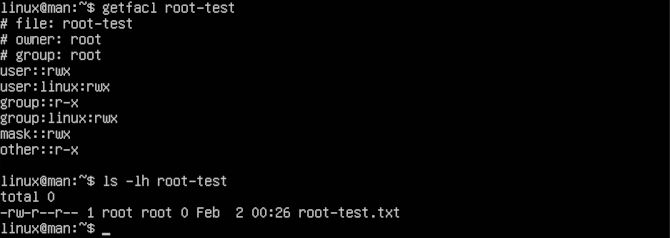
getfacl root-test

You can see the name of the owner as well as the group. Following this, you will see the permissions for root, user, and other. They are defined by r for read, w for write and x for execute.
getfacl user-test

Here you will see some differences. When the root is both the user and the group, your permissions are more limited. If the user is controlling both the user and the group, you have more write permissions granted. Another way to see this information is to use ls -lh to see those same permissions. You will see them inline like this a lot.
ls -lh ~/root-test

This should show the permissions strung together in line. From the earlier examples, this would be top to bottom. Now you can see it from left to right, with a little more information.
IMPLEMENTATION
Now we are ready to start setting our own access control list in our test files.
sudo setfacl -m u:user_name:rwx ~/root-test
You may notice we are using setfacl here instead of getfacl, as before we were getting the files ACL. Now we are setting the file’s ACL. Here, you will want to use your user in place of user_name. This will change the permissions on this directory from root to your user. The -m option is for modifying an ACL. The u: is to specify that you want to change a user. You can change a group by using g: in its place. Then we have the user you wish to give these permissions to, followed by the permissions given. Then we are specifying the directory we wish to alter. Let’s change the group while we are at it.
sudo setfacl -m g:user_name:rwx ~/root-test
Now, your user should be added to the access control list of our root-test directory. This can now be checked out with the following commands.
					getfacl root-test

ls -lh ~/root-test
You can see how the file is still root. The difference is now, linux the user can now read, write and execute the file. Now you can use the getfacl command to check out other files in your system without any consequence. This will help you understand how ACL influences your files and directories. Just remember not to change any important files that may need permissions the way they are to function. At times, you may be setting up a configuration file that needs to be added to root user but remains in your user group to execute properly. Now you have the power to change both user and group permissions using ACL. This is more significant when using files on servers or even in group file sharing environments like an office. Thanks for reading. Get command of your files today!