The headlines are full of cyber warfare reports. Sometimes you need help protecting your server’s SSH access, fail2ban can help. You may even have a web facing server like Nginx, or Apache running, then fail2ban can help. This means you don’t have to be alone when taking on bots or scripts that are looking for a way in. If you have not checked out Top 5 settings to harden your Linux SSH Server then you may want to check out some of those settings as well. The way fail2ban implements security is by stopping offenders after a pre-determined number of failed objectives have been attempted. Fail2ban is built in Python, and was created in 2004.
Today we will show you how to install fail2ban as well as manage your configuration files to last after an update. We will show you how to use fail2ban to help protect your SSH from brute force attacks. Furthermore, we will also cover how to use fail2ban to protect your website’s front end from similar attacks using configurable filters. Now let’s learn how to add another layer of protection to our web servers.
Installing Fail2ban
To install fail2ban is not very difficult. We will go ahead and show the process for a few well known and well utilized server types, Debian and RHEL.
Debian
sudo apt install fail2ban
RHEL
sudo dnf install fail2ban
Now we can go ahead and check on the status of fail2ban.
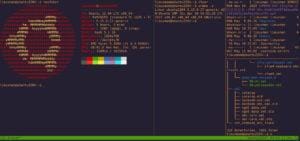
systemctl status fail2ban

You should see it start to run automatically. Fail2ban uses the SSH filter by default. However, we will need to make copies of the configuration files to keep our configurations after updates. We will change the file extension to .local and leave them in the same location.
sudo cp /etc/fail2ban/fail2ban.conf /etc/fail2ban/fail2ban.local && sudo cp /etc/fail2ban/jail.conf /etc/fail2ban/jail.local
Now we can rely on the configuration in our .local copies to stay the same during updates. The configuration can take some time to edit, so this step is a must.
Setup Your Fail2ban Config
The SSH filter is ready to go on installation, though the defaults are not the most desirable. As you may want to adjust the jail time and find time. There are a ton of methods available inside the configuration files to help with this task. We will just show you some basics to be aware of.
sudo vim /etc/fail2ban/fail2ban.local
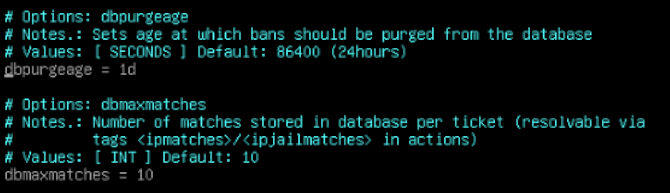
To edit type a. You can see that the default database purge is set to 24 hours. We are going to want those to last a little longer. The other value you may want to change is that of your database max match rate, You can see the default is ten, we pumped it up to what we want to. When you are happy with your values you can hit Esc to stop editing the file, then you can type :wq to write and quite the file. These decisions are largely up to you. Now we will proceed to the real configuration changes.
SSH Server Protection
Now we can configure in our customizations for SSH since it is already enabled.
sudo vim /etc/fail2ban/jail.local
To edit type a. In here we are going to want to start by adding our own IP to “ignoreip” section, around line sixty. This way you will never get banned. The next thing you will want to change is “bantime”, you can add what you like here. Just remember it is no use for it to be longer than the database that holds the existing data. So make your choice according to you how you configure fail2ban.local.
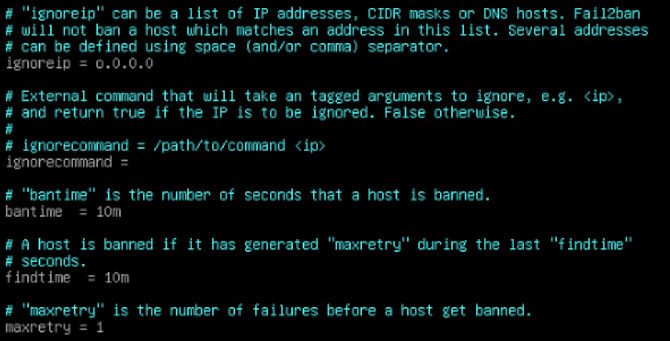
Next there is “findtime”, which is the interval of time the offenders have to offend. Next you will want to make “maxretry” one. This is because your SSH settings dictate these times by default, so if you change that to a lower number it will be lowered. So, they would have to get three brute force attempts on SSH or in the other jails we can activate. Now we can go down to the SSH jail activation section.
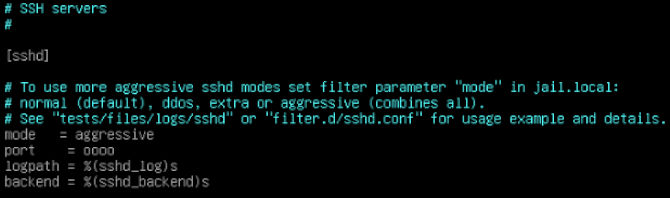
Look for the heading “[sshd]” section. Now you can see there are a few configurable parts to this. You can go ahead and set it into “aggressive” mode. You can also add an IP “port” number to add to this feature. Giving you a nice buffer of protection.
Nginx Bot Blocking
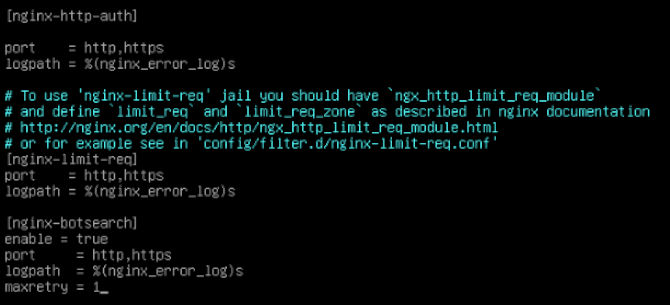
Now you notice we never closed Vim. This is because we are still working in this file to work on Nginx. Now we just need to head down to line three hundred and sixty. We will look for the heading “[nginx-botsearch]” this is where you want to enable it to be true just like you may have noticed in the sshd section. That will look something like “enable = true”. This is focused on the web ports by name rather than number. Below this, you will find “maxretry” again. You can set this to one as well if you wish. When you are happy with your values you can hit Esc to stop editing the file, then you can type :wq to write and quite the file.
Now there are tons of pre-existing configurable sections like this one. Apache is above Nginx, and it has a lot more configurable pieces. There are even sections for web applications like Drupal, this also includes other stuff like Roundcube mail server. The list goes on. You can protect your FTP servers, proxies, all sorts of stuff. We fell like you should go shopping, see what you need down there for your purposes. Now we need to tell systemctl to restart fail2ban to make sure our changes go into effect.
sudo systemctl restart fail2ban
Bonus
Now that you have fail2ban on your side you can check on your logs from time to time. This will help you make adjustments to the values we just went over. We will use the -f option to make the file readable in real time. You will need to type Ctrl c to exit.
sudo tail -f /var/log/auth.log
This will give you the authentication logs. It can be pretty scary to look at. Try to remember it’s the internet. It is a pretty wild place.
sudo tail -f /var/log/fail2ban.log
The following command will give you a similar log for fail2ban in particular. Giving you some information you may need one day.
sudo tail -f /var/log/nginx/error.log
Finally, this command will give you the bot traffic hitting your front end. This will show the offending IP address along with whatever crazy hack they tried to pull off. Sometimes they are just trying to copy your site. Other times they are trying to get into your directories to access parts of your site. It is sometimes a little crazy, but that is why fail2ban is here to help you. It is a great tool to bring you some more eyes on the temple gates so to speak. Fail2ban is not an end-all for hackers. So use it as part of your toolbox. Thanks for reading.