
If you run any kind of data server at home, like a NAS, or homelab, keeping an eye on your hard drive health is imperative. smartmontools can provide an indicator of health using the disks’ SMART values. What is SMART? SMART stands for Self-Monitoring, Analysis, and Reporting Technology, most modern hard drives, SSD, and eMMC drives are equipped with this onboard diagnostic. This records and reports various details about your storage media. smartmontools can also run scheduled health tests, and has a daemon that that can monitor your disk(s) health and notify you via email, should anything happen. Any sysadmin worth their salt cares about their drives, and we are worth our salt, right?
Installation
When it comes to installing smartmontools we have a few options, you can build it from source or use the pre-compiled package if its available on your distro. As always preform a system update before installing anything to ensure a stable, secure system.
From Source
Use wget to get the latest version (as of the time of this writing was v7.3) from sourceforge.
					wget <https://phoenixnap.dl.sourceforge.net/project/smartmontools/smartmontools/7.3/smartmontools-7.3.tar.gz>
tar zxvf smartmontools-7.3.tar.gz
# install a c++ compiler like g++ if you get an error during compiling
# e.g sudo apt install g++
cd smartmontools-7.3/
./configure
make
sudo make install
From Package Manager
Use the right command for you distro.
					#for debian/ubuntu
sudo apt install smartmontools

#for arch
sudo pacman -S smartmontools

#for Fedora\RHEL
sudo yum install smartmontools
Usage
smartmontools comes with two tools, smartctl, which is the main CLI you use to probe your disks, and smartd a daemon which monitors your disks in the background. Let’s take a look at what we can do with smartctl first.
Smartctl
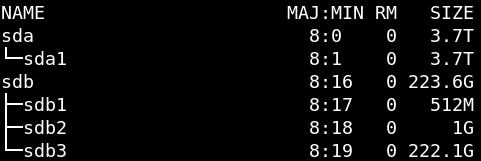
Before we can get any useful data from smartctl, you need to specify what drive to inspect first. By simply running lsblk, you can find all the currently mounted drives
lsblk
Here’s some example output you could see from lsblk.
Once you have the name of the drive you wish to inspect you can run one of the following commands to get more information about it. I’ll provide a table with the switches here, note that this is no substitute for smartmontool’s own docs, which can be brought up at anytime using man smartctl or using this link:
| Option | Action |
|---|---|
-h, –help |
Prints out a table with a brief overview of the commands and their
syntax |
–scan |
scans all devices and prints out their names, type and protocol. |
-d TYPE |
smartctl will guess the device type, but if you need to specify it manually
you can do so with this switch. eg (ata, scsi, nvme, see man page for full
list etc) |
-i, –info |
prints various information about the device |
-H, –health |
Reports SMART health status. On “fail” status the drive is already dead or
will die very soon. |
-a, –all |
Prints all SMART info about device. I recommended piping the output to less,
more, or pager. |
-s (on, off) |
Enable/disable SMART on device. |
-o (on, off) |
ATA only, enable/disable SMART automatic offline test (checks disk every 4
hours for defects) |
-x, –xall |
prints all SMART and non-SMART information about the device. |
-S (on, off) |
Enables/disables SMART autosave of device vendor attributes. Needs only be
ran once and preserves this data even if disk is powered off. |
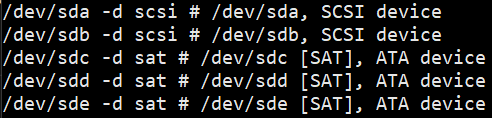
The best way to learn is to jump in! Let’s first run a --scan switch so that we can get the type of drives we have. Some example output might look like this:
From here, you can probe whatever disk you want for more information. Here are some example commands you can use to scope out your drives.
					# scans all drives and displays their type
smartctl --scan

# -i gives a brief overview of the drive
sudo smartctl -i /dev/sda

# -a will print out a large amount of information and stats; piped to pager
sudo smartctl -d ata -a -i /dev/sda | pager #or more or less

# enable SMART and offline testing on device
sudo smartctl -s on -o on -S on /dev/sda

# check smart health
sudo smartctl -d scsi -H /dev/sdc
The -H switch will produce some output like this:

If your device did not receive an “OK”, your hard drive might be scrap or in the process of becoming a paperweight, in which case it is time to migrate/rescue your data or Office Space your hard drive in a field somewhere.
smartd
CLI tools are all well and good, but the real treat that comes with using smartmontools is smartd. By default smartd will enable SMART on all devices and poll attached ATA & SCSI devices every 30 minutes, logging SMART errors, or changes in preconfigured attributes via syslog. It can also be configured to send you email alerts, but more on that later. **smartd is configurable via /etc/smartd.conf which is heavily commented with examples, I’ll again provide a brief summary of the important ones next:
| Option | Action |
|---|---|
-q WHEN |
Tells smartd when to quit. See full man page for full details. One useful option is onecheck, which registers attached devices and checks the status of the devices exactly once and returns this as text output. |
-d, –debug |
verbose status information, and does not fork into the background, in this mode, CTRL+C will not exit the readout but instead reload the smartd config, to exit this mode use CTRL+\. |
h |
prints help and command summary |
-i N, –interval N |
Sets how often smartd will check disk in seconds, default is 1800 secs or 30 minutes. |
Now let’s start smartd using systemd but feel free to substitute with your own init manager. These are all self explanatory.
					sudo systemctl start smartd.service
sudo systemctl stop smartd.service
sudo systemctl restart smartd.service
Using the info from the table we can use these starter commands to get some useful monitoring information in real-time.
					#register and check all devices once
smartd -q onecheck

# run in foreground in debug mode, checking polling every device every 15 seconds
# exit with ctrl+/
smartd -d -i 15

#running smartd on its own will run in the daemon in the background and log to syslog
smartd
Now that the process is running we can set up /etc/smartd.conf. But before we do that let’s side step and quickly setup the email notification requirements before we hit up the config file.
Setting up Email Notification
smartd can not send mail on its own, by default it will attempt to use whatever mail system is installed on the server, typically sendmail which if not configured so it will just send these alerts to /var/spool/mail/username – not super useful. In order to get these alerts off our server we’ll need to have MTA (mail transfer agent) and an SMTP server. In our case, to avoid having to setup an entire SMTP server just to get hard drive alerts, we can just use the packages: msmtp, msmtp-mta and use Gmail as an SMTP relay. In other words we will use a Gmail account to forward the smartd alerts. Note that you can also accomplish this with postfix or exim4 but those require extra configuration.
Setting up Gmail
If you don’t use Gmail feel free to skip this section and move on to installing msmtp section.
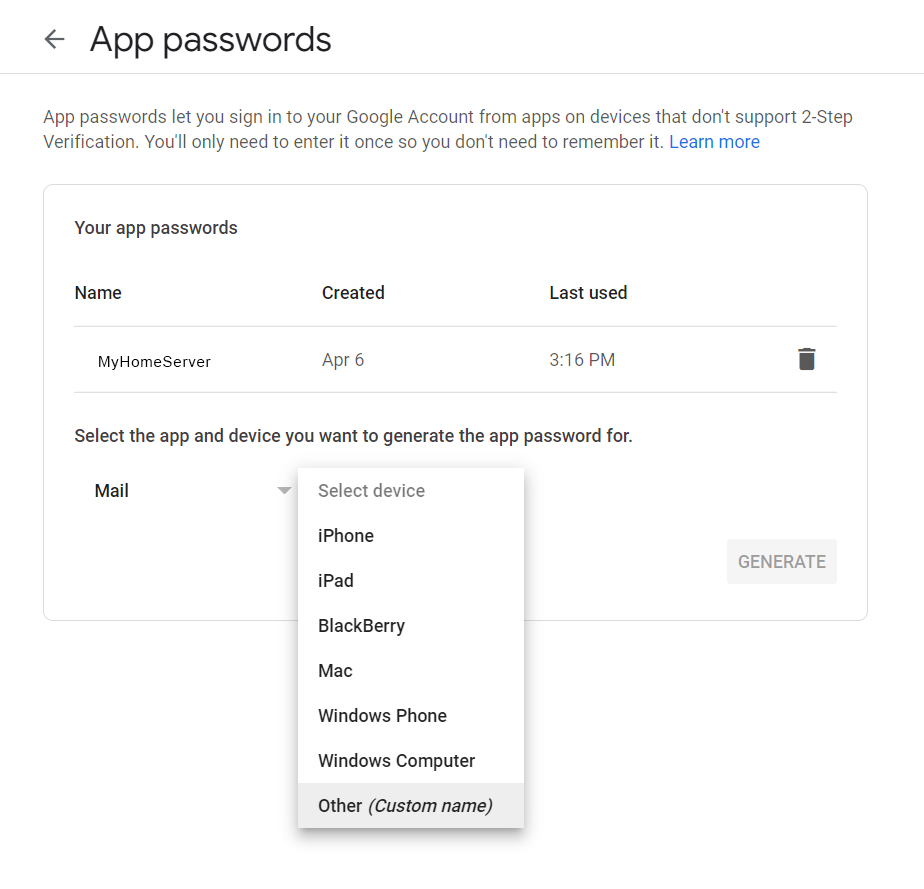
To setup a Gmail for this, all you need to do is visit this link. Which after logging in will allow you to create an app specific password. It will then show you the app password, and you must copy this down somewhere because it won’t show you this password again.
Installing msmstp
msmtp is a very simple, light SMTP mail client, First thing we need to do is install msmtp.
sudo apt-get install msmtp
Once that installs you must create and edit the /etc/msmtprc file using your text editor of choice. I’ll use vim here, but you can use nano or text editor of choice:
sudo vim /etc/msmtprc
Quick Vim Tips! press i or a to enter INSERT mode, then hit ESC to exit INSERT mode and then type :wq! to save and exit.
Once there, enter the following in that file. If you want to use something other than Gmail, all you need to do is enter your SMTP providers details instead where noted. For more help check out msmtp’s ArchWiki entry, linked here.
					# /etc/msmtprc
defaults
auth on
tls  on
tls_trust_file /etc/ssl/certs/ca-certificates.crt
logfile ~/.msmtp.log #this can be whatever destination you choose

# Gmail configuration
account gmail
host    smtp.gmail.com
port    587
from    your@gmail.com
user    yourusername
password app-specific-password

# An alternative service, enter your SMTP details here
account        yourmail
host           smtp.yourmail.net
from           nobody@yourmail.net
port    333
user    yourusername
password app-specific-password

account default: gmail # or yourmail
NOTE: This file will store your app password in plain text
After the file is created, it must be given the correct file permissions, otherwise it will not send.
					groups msmtp
sudo chown msmtp:msmtp /etc/msmtprc
sudo chmod 600 /etc/msmtprc
Now that we have msmtp setup we now must create the /etc/mail.rc file which will tell sendmail to use msmtp or we can use msmtp-mta, which symlinks sendmail to msmtpa or simply type a command in the terminal. I’ll present all three options below:
					#create and edit mail.rc
vim /etc/mail.rc

# enter the following in /etc/mail.rc or on its own in terminal
set sendmail="/usr/bin/msmtp -t"

# install msmtp-mta
sudo apt install msmtp-mta
Just because I’m a stickler, I did all three methods, redundant I know, but I really wanted to make sure I could get emails out. Once you have that done that, you can send yourself a test mail from the command line with the following:
echo -e "Subject: This is a Test" | sendmail your@gmail.com -F servers-hostname #can be plain hostname
If it shows up in your inbox you are good to go, if not, troubleshooting you must go.
Configuring /etc/smartd.conf
Now that we have the mail system setup, let’s take a look at /etc/smartd.conf. which is a heavily commented file with tons of examples for scheduling tests, and setting up various attributes to monitor. Open /etc/smartd.conf with your preferred editor, then look for line #22.
sudo vim /etc/smartd.conf
You should see something like the following, which can be safely commented out and replaced with the following directive which will among other things, test the email functionality on the reboot of the entire smartmontools service. It can be triggered manually by using: sudo systemctl restart smartmontools.
					#/etc/smartd.conf
#...
#DEVICESCAN -d removable -n standby -m root -M exec /usr/share/smartmontools/smartd-runner
DEVICESCAN -a -m your@gmail.com -M test
#...
If you did it all correctly you should get an email for every hard drive installed on the system, in my case I received 5 test emails from msmtp. Now is a good a time as any to cover some more basic directives we can use inside this file. Starting at line #114, there is a very comprehensive list of which I’ll summarize some key ones here:
| Option | Action |
|---|---|
-a |
Equivalent to running -H -f -t -l error -l selftest -C 197 -U 198 |
-H |
Monitor SMART Health, and report failures |
-f |
Monitor for failure of any ‘Usage’ Attributes |
-t |
Equivalent to -p and -u |
-p |
Report changes in ‘Prefailure’ attributes |
-u |
Report changes in ‘Usage’ attributes |
-l TYPE |
Monitor SMART log. options are (error | selftest) |
-C ID |
Report Current Pending Sector counts |
-U ID |
Report Offline Uncorrectable counts |
-m |
Send warning email with results of -H, -l, and -f |
-M Type |
See the man page for other options. Using -M test, Sends a test email an
service start. |
-d TYPE |
Specifies type of devices just like smartctl |
-W (D,I,C) |
Monitor temperature Difference, Informal
limit, & Critical limit. |
-s (L/../../7/02) |
Schedule tests using REGEXP, see man. |
Now that we know our email works we can go ahead and comment out that test directive and setup a real world option using the above table and man smartd. Let’s say that instead of monitoring every disk, what if I just wanted to be alerted about one specific drive and run Health Checks every Sunday at 2-3am or if I only wanted to be alerted of any SMART errors?
					#monitors /dev/sda and preforms a long test every sunday between 2-3am
/dev/sda -d scsi -a -s L/../../7/02

# Only reports SMART health failures to a email addres
/dev/sdc -H -C 0 -U 0 your@gmail.com
There are tons of examples in the conf file so I recommend giving it a thorough read as this is only a very small example of what can be done with smartd.
Conclusion
Congrats on a successful smartmontools installation! You’ve now leveled up your sysadmin game, and you can now shoot lightning out of your finger tips! Not really but being able to get an email notification is pretty hardcore if I do say so myself, it sure beats the hell out of manually checking your drives or doing what I do, and just don’t check at all until there’s a failure. Happy sysadmin-ing and may all your hard drives be blessed with many read/write cycles and no bad sectors, amen.
A note on security: Now in order to be good admins, we shouldn’t store plain text files on our servers, so you have to weigh in the benefit having email alerts or implementing something like pass or a keyring so that you can encrypt that file.


2 Responses
Your guide is the only one that has nearly put me where I’m able to send functional reports to myself. I’m hoping maybe you would be willing to assist me with getting over the final hump. Linux is not in my normal wheelhouse so this has a fun and equally frustrating learning experience.
I have followed your guide to the end, and been able to successfully function test this command: echo -e “Subject: This is a Test” | sendmail your@gmail.com -F servers-hostname #can be plain hostname
However, I’m unsuccessful in getting any test reports to fire off to my email.
Hi Timothy!
Sorry on super late response, but have you considered using mailx instead? I recall having issues using sendmail in the past and mailx made it much easier. Hope this helps!