Okay, you just installed PyCharm as your IDE and you want to get started. We will make the following assumptions:
- You are somewhat familiar with coding (most likely Javascript or some other client side scripting).
- You know what variables are and have an idea what a loop is.
- You are somewhat familiar with building an interface, even building a form in HTML or Access
- You have a basic understanding of object oriented programming (we will cover some of that)
Okay, so we will get started with this, and will NOT do “Hello World.”
Opening and configuring PyCharm
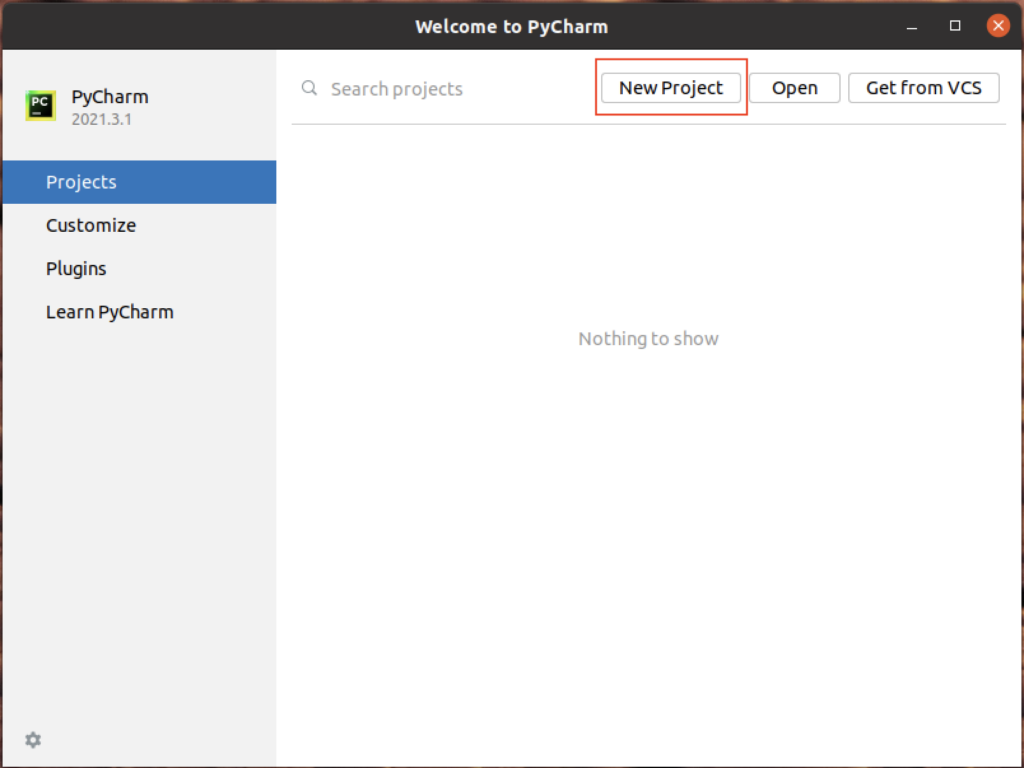
I am assuming you already know how to open PyCharm Community (or Professional if you upgraded). I keep it simple and launch from the JetBrains Toolbox. You may have created a shortcut or shell script to launch. You will be taken to the PyCharm Welcome screen and you will need to click on New Project.
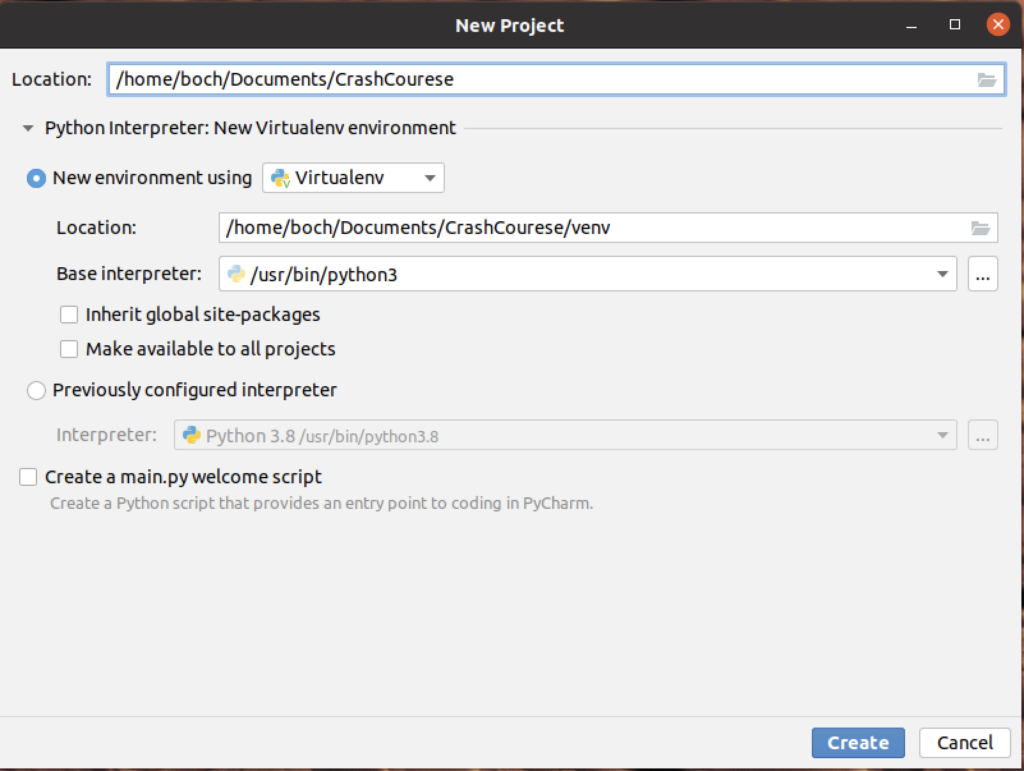
Now, you will need to decide WHERE you python project exists, and what to name it. Here is my starting configuration for a new project:
Yes, you need to start a new Virtualenv. There are multiple choices there, just use virtualenv. For Base Interpreter, use Python3. You may have an earlier version of Python on your machine (Python 2, and I am not sure why). Once done, hit “Create.”
Installing a UI (Kivy)
Here is where the “crash” from Crash Course comes in. We are diving right in with creating screens, and we will be learning as we go. I feel that if you don’t create something “real” right away, you may lose interest. I promise you will get it by the third tutorial you do. If you have questions, please post in the comments.
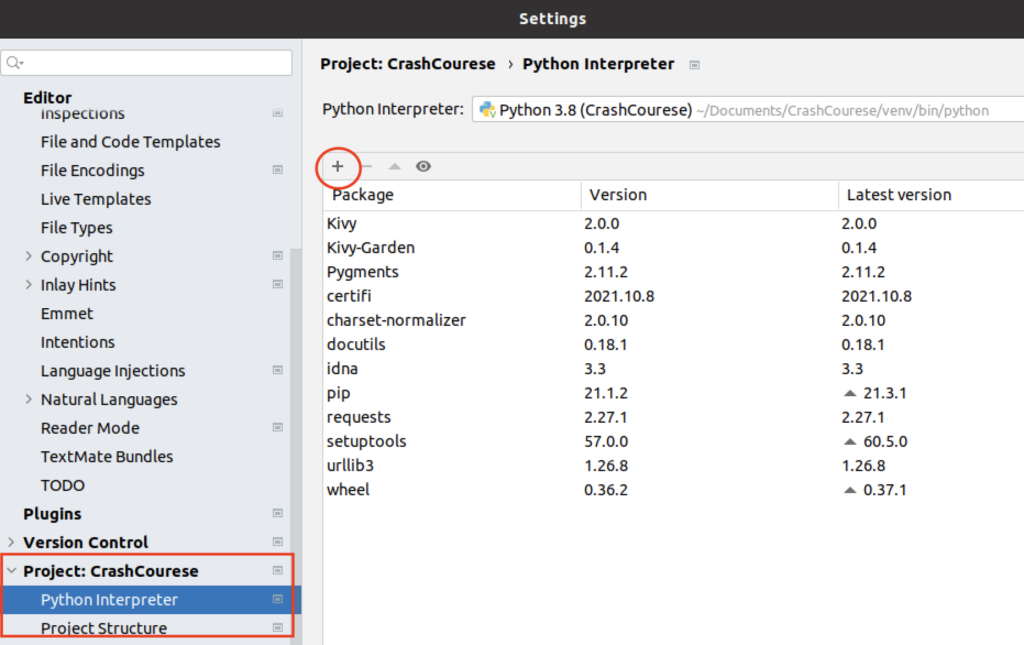
First, Go to File=>Settings. This will open the settings dialog. Look on the left, you will see Project:Crashcourse (or whatever you misspelled it as…). Open it up, and look for Python Interpreter. This is the one you chose earlier. See that Plus Sign (it is small) click on it.
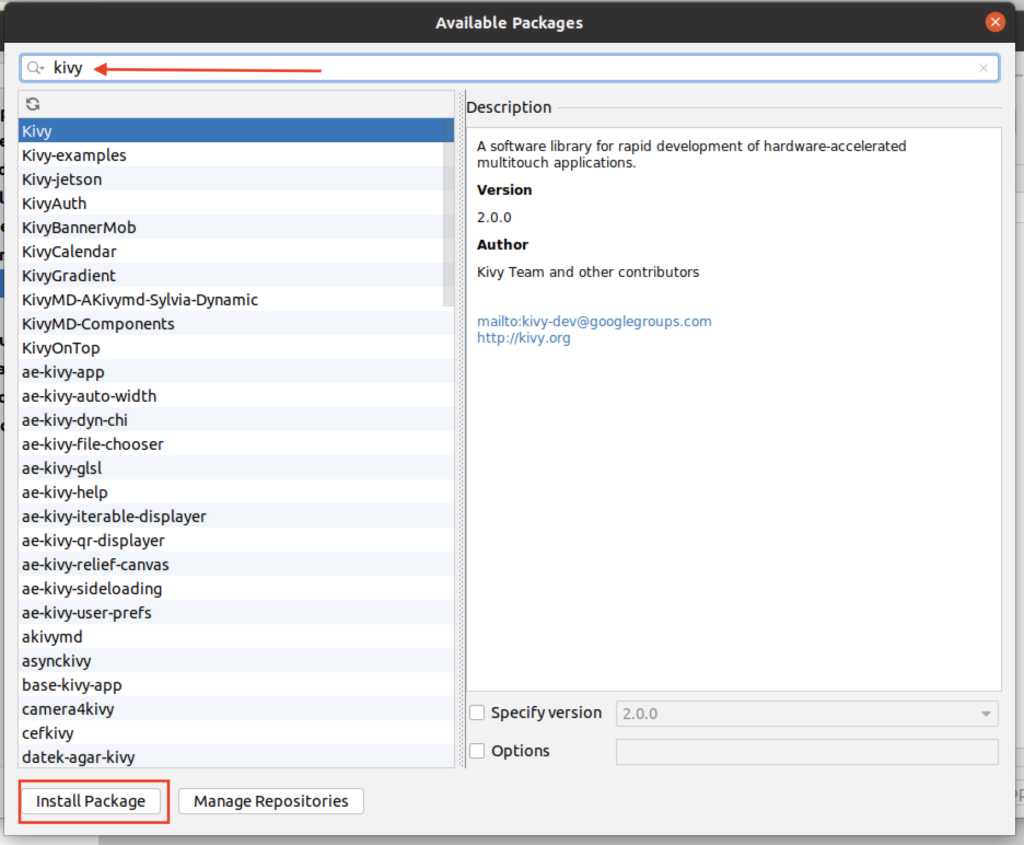
Another new window appears. Search on the phrase “Kivy” and then click Install Package.
Now, when you are installing Kivy for real, there are a lot of dependencies (other libraries that may be needed). You don’t have to worry about that. You created a virtual environment. If you really really mess it up, you can recreate it. Just install Kivy for now. If you find yourself getting messages that a particular library is not available, just note the name and add it later.
Creating your Files
We are going to create two files now. We are going to create a Python file for code, and a .kv file for the layout. For those of you with a web designing background (you know who you are), this is very similar to keeping your basic design inside an html (or .php) file, but your design elements inside a .css (cascading stylesheet). Also, remember that you can keep your client side scripts in yet another file (a js file).
Now, we are going to create the main program file. Normally, in Python, this is called main.py, but we are NOT going to do this. We may be creating multiple programs and layouts in this project, so we will not be using Main.
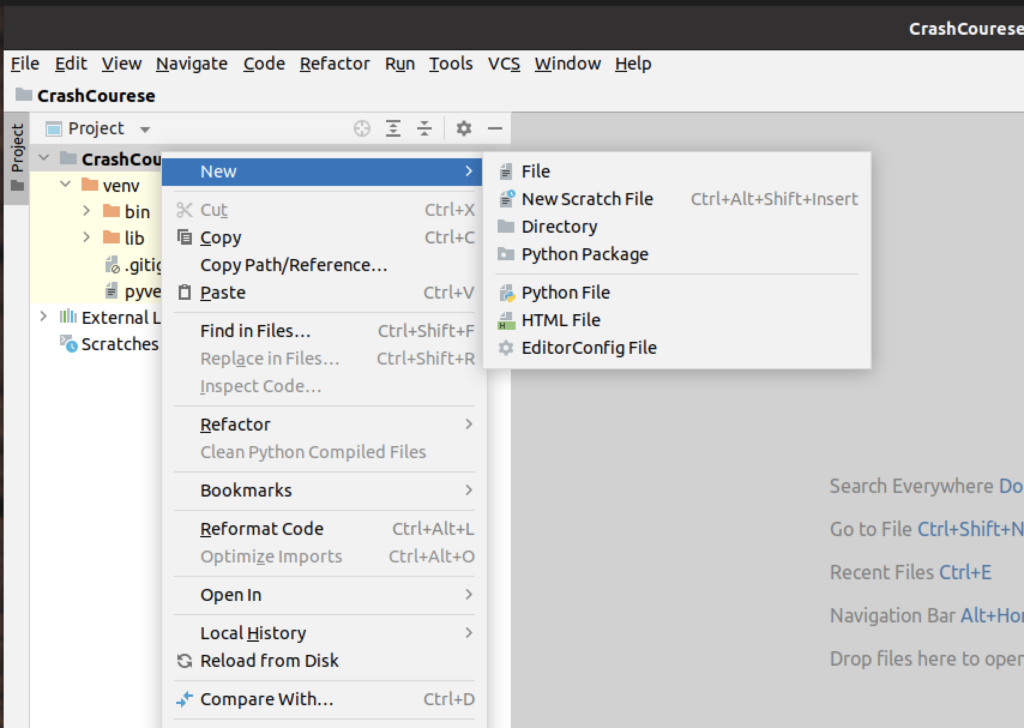
Just for the record, I HATE keyboard shortcuts. Sure, I don’t mind the items that are the same across applications, (Ctrl-c copy, ctrl-z for undo, Ctrl-v vaste…)but otherwise I prefer menus. So the best way to create a new file is right-click on the main folder.
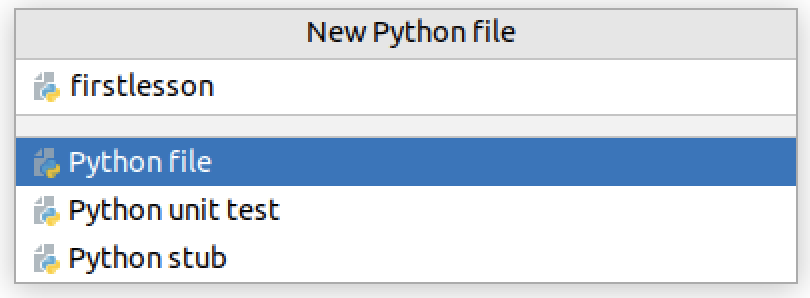
We are going to create a new
Once open you will be able to build your code. Most of your programs will be set up like this initially.
					#firstlesson.py

from kivy.app import App

class FirstLessonApp(App):
    pass

FirstLessonApp().run()
So, let’s explain what is going on. As I mentioned in another article, one of Python’s great assets is that there is a lot of existing code that you can build upon. We are using the Kivy UI library. We import this with Line 1. Next, in line 3 we build our main app class. We call this FirstLesson… it doesn’t matter what we call it, but it should end with “App.” Capitalization matters somewhat in Python. Thus FirstLessonApp is not equal to firstLessonapp. There is no official rule for class names, but I generally use full capitals for Class names and camel notation (camelNotation) for variables.
So in Line 3, we instantiate the App Class (create a linked duplicate, if you will). Thus, if we add code to our clone/duplicate, we will not be making changes to kivy.app.App, BUT if there are changes to the original, that code can be referenced in our clone. Thus, if kivy.app.App gets new code, and we update our library, that new code will be available in our FirstLessonApp, since it inherits everything from the “parent.”
Creating the .kv file
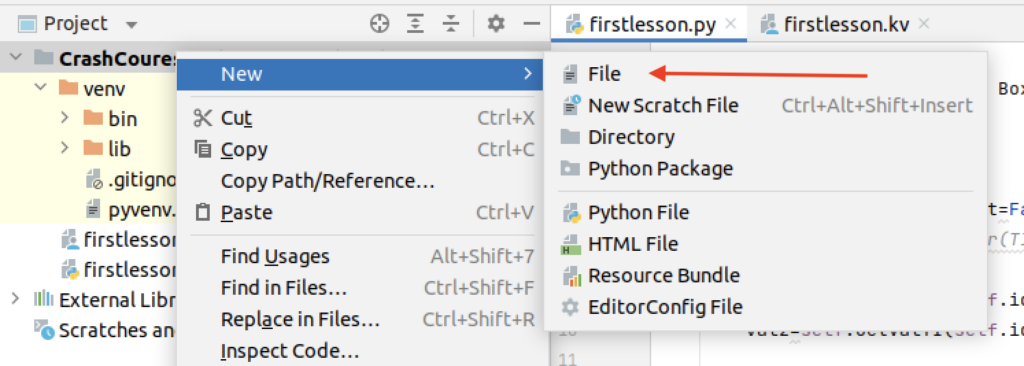
Now we are going to create the .kv file, which is almost the same as creating the .py file. However, instead of selecting Python file, you are just going to create a file.
You are going to name this firstlesson.kv. The name is important. If you want your .kv file to be loaded automatically, you will use the following logic:
Take the lowercase version of your name, but subtract the App and add .kv. So FirstLessonApp becomes firstlesson.kv file. You must add the .kv extension (whereas you didn’t need to with the python file).
The first lines of the kv file are a bit tricky, just trust me on this.
					# firstlesson.kv

NumLayout:
<NumLayout@BoxLayout>:
  orientation:"vertical"
Okay, line 1 we are defining our layout (called NumLayout) and in the next line we are declaring that NumLayout inherits from BoxLayout (this is another KV class). There are other types of Layouts you can use. Using a layout manages how your application looks on different screen sizes on different types of devices.
Now items that you declare in the .kv file have events and properties. If you worked in html or Access, you know that there is label.text or label.color. BoxLayout and an orientation property (note, all properties are lowercase!!!). Orientation takes a string, which will be horizontal or vertical.
SideBar: Formatting your KV file as you type
PyCharm does a great job of code hinting (suggesting code) when in the Python file, but not a .kv file. However, you can fix this.
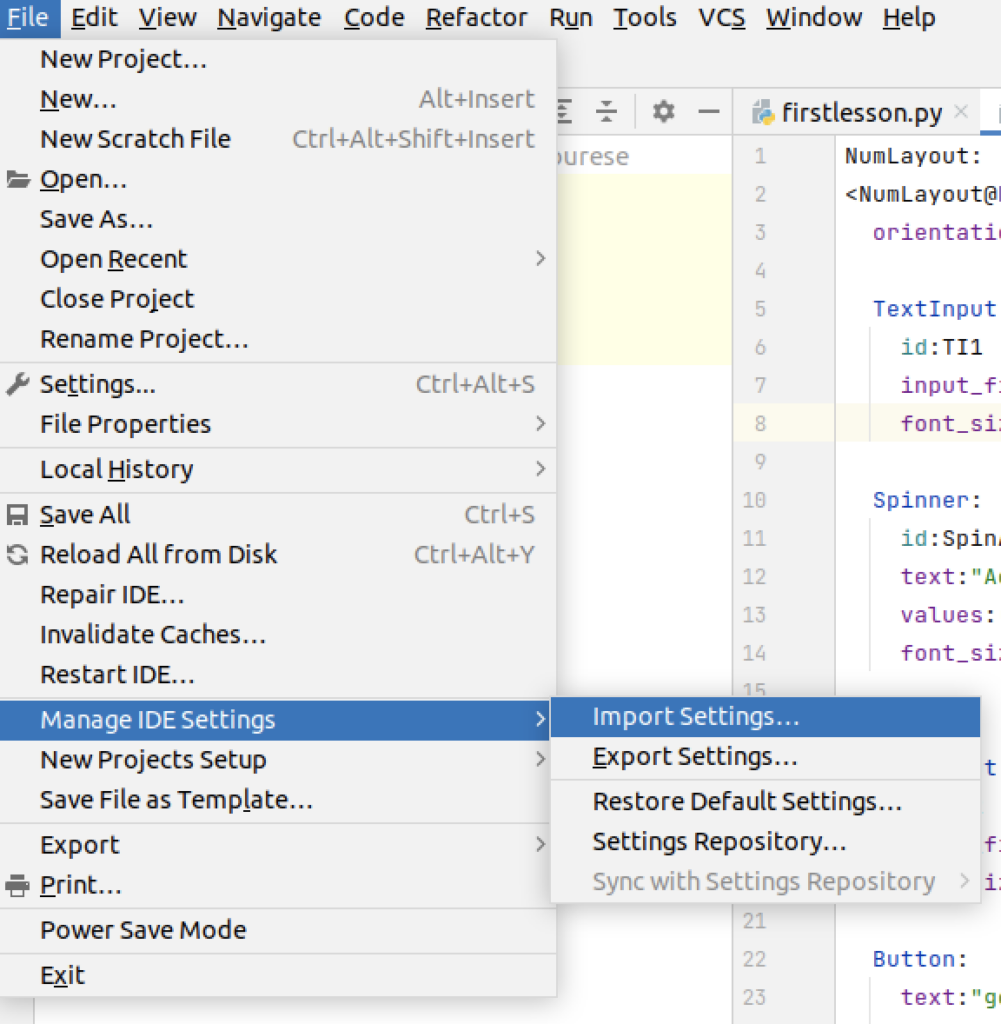
First go to https://github.com/noembryo/KV4Jetbrains/releases (there are other plugins as well). Download the .jar file and remember where you saved it (seriously). Okay, then go to PyCharm and file=>Manage IDE Settings=>Import Settings.
Navigate to the file you downloaded, and click ok.
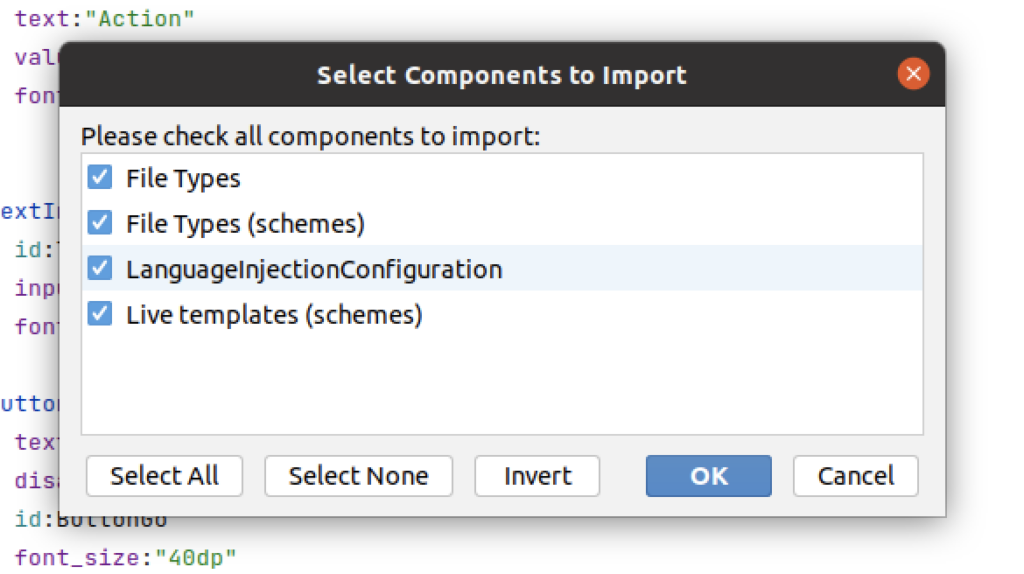
With the next dialog, just leave all the checkboxes checked.
You will need to restart your PyCharm. Now you have code-hinting on your .kv file.
Adding Widgets to our Layout
Okay. When you declared your NumLayout (class) as a BoxLayout, you were creating a type of playpen. Now, you will be adding toys to your playpen. However, you need to keep them organized in invisible shelves (that is your BoxLayout).
					# firstlesson.kv

NumLayout:
<NumLayout@BoxLayout>:
  orientation:"vertical"
#adding our first widget
  TextInput:
    id:TI1
    input_filter:'float'
    font_size:"40dp"
I hope you are not too confused. We are adding TextInput under NumLayout (or within). It should be indented to match the orientation property. After defining it, we will be adding the id (critical!!!!), the input_filter and font_size. Now, if you are confused, I was too. I was going to write a bunch of code to make sure that the user could only enter in numbers, but Kivy beat me to it. Also, the font_size may look a little weird. DP is for “density independent” pixel. It sort of means that the Python interpreter will do its best to make your screen look amazing no matter what the size. There are other options as well (you may want to play around with “sp”).
So just like HTML we are building things in order of how we want them to appear. We can move things around in the python file or kv file, but honestly that is confusing.
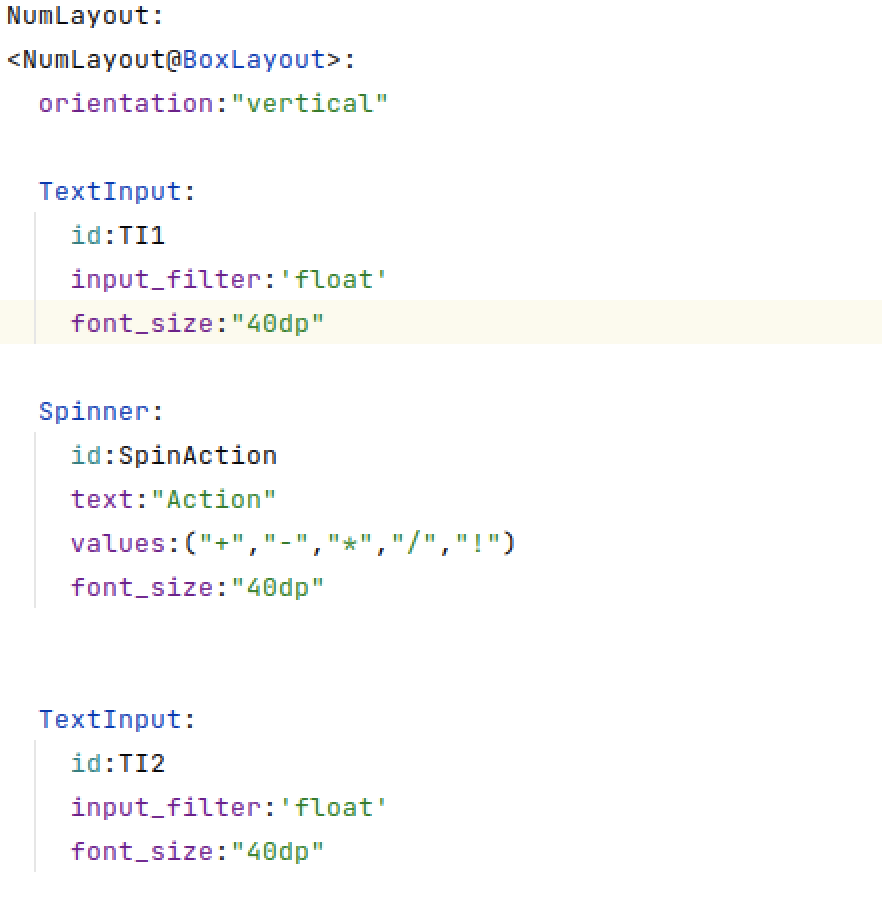
We will now add all of the widgets we need. Hopefully you will figure out what we are building:
					# firstlesson.kv

NumLayout:
<NumLayout@BoxLayout>:
  orientation:"vertical"
#adding our first widget
  TextInput:
    id:TI1
    input_filter:'float'
    font_size:"40dp"
#  a spinner is a Kivy style dropdown box
  Spinner:
    id:SpinAction
    text:"Action"
    values:("+","-","*","/","!")
    font_size:"40dp"

#another textinput, like the first
  TextInput:
    id:TI2
    input_filter:'float'
    font_size:"40dp"
#button button who's got the button...notice the on_press event.  IT is not a property.  on your PyCharm screen it
# be a different color.
  Button:
    text:"go"
    disabled:False
    id:ButtonGo
    font_size:"40dp"
    on_press:root.CalculateMe()

  Label:
    id:Answer
I hope you retype everything and just don’t cut and paste. This way you can see some of the code hinting. They only two “special” lines are
13-Here we are adding all the values that appear in the drop-down list (er, spinner).
28- Here we tell the program where to go when the button is pressed. on_press is an EVENT not a property. It will look different if you installed the kv code hinting plugin.
Our Python File
Here is the fun part. I tried to add just enough to show you different features but not underwhelming you, but not too much to overwhelm you. Hopefully you are just whelmed.
					# firstlesson.py

from kivy.app import App
from kivy.uix.boxlayout import BoxLayout


class NumLayout(BoxLayout):
    # calculate me is declared in the NumLayout class,  NOT the main app class.
    def CalculateMe(self):
        val1=self.GetValTI(self.ids['TI1'].text)
        val2=self.GetValTI(self.ids['TI2'].text)
The class declaration (small c) should look familiar . We are just saying that NumLayout inherits from BoxLayout. We are keeping the code inside the NumLayout class because we could have other layouts, and they would have their own code. This keeps everything isolated. However, if you have code that would be used across multiple layouts, you could put it in your FirstLessonApp() class.
Now, you may notice a couple of very, very important things. The are declaring a method called CalculateMe(), which is the exact same name in our .kv file. That .kv file called out root.CalculateMe(), which means it is declared in the root (NumLayout). It is tricky, but you will get the hang of it.
We are also referencing items on our Kivy layout using the “id.” We use self.ids[‘idname’].property. Now previous versions of Kivy used self.ids.idname.property , so if you are using an older Kivy version, you will get an error. Kivy is awesome, but it is still somewhat fluid. However, because of your virtual environment, you can work with whatever you want. And when you package your application, the entire set of libraries you choose (including Python) go with it.
Finally, we are setting the values of the text inputs (which are limited by input_filter) to being float numbers to a couple of variables. You should remember that even though we are typing numbers, Python sees them as strings (text). We need to convert them
Calling a Function/Method and using If Else
So we need to do to things: Convert the value in the TextInput to numbers and set it to zero if is blank. We create the following method/function within NumLayout (at the same indent level as CalculateMe().
					# firstlesson.py
#...
class NumLayout(BoxLayout):
    # calculate me is declared in the NumLayout class,  NOT the main app class.
    def CalculateMe(self):
        val1=self.GetValTI(self.ids['TI1'].text)
        val2=self.GetValTI(self.ids['TI2'].text)


    def GetValTI(self,sentVal):
        #remember sentVal is a string!
        if sentVal != '':
            toSendVal=float(sentVal)
        else:
            toSendVal=float('0')
        return toSendVal
Our method is simple. We call it GetValTI and there are two arguments (self, which is always declared as a good practice, and sentVal, which is the value from the TextInput. If the sentVal is not blank, (!=”), then we convert the text to a float and assign the value to toSendVal. We use a simple If else. Just be careful of your indentation. There could be multiple lines under each part, they would just be indented to match the first line.
The else part of the if…else occurs if the TextInput is blank. Then we set toSendVal to the float value of the string ‘0’. I did it this way to keep the logic consistent.
Once it is done, we return the value of toSendVal (which is a float!) to the line that called it (lines 4 and 5).
If and Elif
Now here is the core of our application. If you haven’t figured it out yet, it is a different type of calculator.
					# firstlesson.py
#...
class NumLayout(BoxLayout):
    # calculate me is declared in the NumLayout class,  NOT the main app class.
    def CalculateMe(self):
        val1=self.GetValTI(self.ids['TI1'].text)
        val2=self.GetValTI(self.ids['TI2'].text)


        if self.ids['SpinAction'].text=='Action':
            self.ids['Answer'].color=(1,0,0,1)
            self.ids['Answer'].text="you must choose proper action"
        elif self.ids['SpinAction'].text=='+':
            self.ids['Answer'].color = (1,1,1,1)
            self.ids['Answer'].text=str(val1+val2)
        elif self.ids['SpinAction'].text == '-':
            self.ids['Answer'].color = (1, 1, 1, 1)
            self.ids['Answer'].text = str(val1 - val2)
        elif self.ids['SpinAction'].text == '*':
            self.ids['Answer'].color = (1, 1, 1, 1)
            self.ids['Answer'].text = str(val1 * val2)
        elif self.ids['SpinAction'].text == '/':
            self.ids['Answer'].color = (1, 1, 1, 1)
            self.ids['Answer'].text = str(val1 / val2)
        elif self.ids['SpinAction'].text == '!':
            factor=int(val1)

            for it in range(factor-1,1,-1):
                factor*=it

            self.ids['Answer'].text = str(factor)
Python does not have Switch Case that is available in other applications. You have to you use If Elif (else if) like here. No explanation should be needed (until we get to the ‘!’). Basically, we get the value of the spinner. If nothing has been selected, we tell the user they must choose an action. Thus if they chose “+” we add the numbers. Note that we change the color of the answer (self.ids[‘Answer’].color) to match the answer type.
If you worked with any coloring scheme in HTML or CSS or PHP… you should understand the formatting. The numbers in parentheses equal (red, green, blue, opacity/alpha). Any value between 0 and 1 is acceptable. It is easy to think in terms of 0=no red paint, 1=100%=all the red paint we have. If we set everything to 0 we get black; if we set everything to 1, we get white (it is addictive like light).
For Loop for calculating Factorial
This calculation could be your biggest challenge. For this we just ignore the value in the second text input (to improve the UI, we could disable the second input or blank it out….I will leave that to you). Then we create the following For…Range Loop:
					# firstlesson.py
#...
elif self.ids['SpinAction'].text == '!':
            factor=int(abs(val1))

            for it in range(factor-1,1,-1):
                factor*=it

            self.ids['Answer'].text = str(factor)
Since our factorial only works with natural numbers, we set the variable factor to the absolute (abs) value of the integer of val1. Remember, it is a float. We need to make it positive (positive reinforcement will not work), and remove all the non-integer stuff.
Factorial is just a number multiplied by all of the integers before it (6!=6*5*4*3*2*1), so we use a For… in range loop.
for variable/counter in range (starting value, end value, increment/decrement value)
For our loop it starts with our factorial value minus 1, and we go down until we get to one.
factor *=it (it is our counter) is just a simpler way of writing factor=factor*it. You have probably used something similar in other languages.
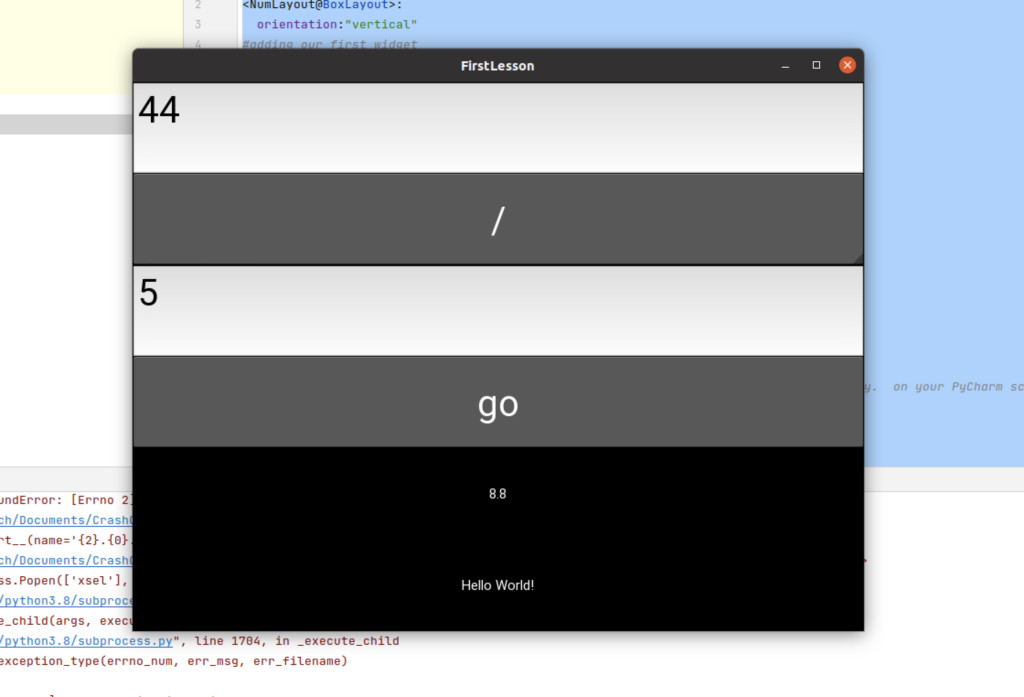
Now you can run your code (the green arrow in the upper right). OR you can right click on your python file and select “Run”. You may have errors, but PyCharm does a great job of helping you fix it. I refuse to include a picture of it.
Okay I will.
The Final Step
Of course, we must have to complete our first python lesson (our crash course) by adding the following lines to our application in the .kv file:
					# firstlesson.kv
#...

 Label:
    id:tradition
    text:"Hello World!"
The complete Code:
					# firstlesson.py

from kivy.app import App
from kivy.uix.boxlayout import BoxLayout


class NumLayout(BoxLayout):
    # calculate me is declared in the NumLayout class,  NOT the main app class.
    def CalculateMe(self):
        val1=self.GetValTI(self.ids['TI1'].text)
        val2=self.GetValTI(self.ids['TI2'].text)


        if self.ids['SpinAction'].text=='Action':
            self.ids['Answer'].color=(1,0,0,1)
            self.ids['Answer'].text="you must choose proper action"
        elif self.ids['SpinAction'].text=='+':
            self.ids['Answer'].color = (1,1,1,1)
            self.ids['Answer'].text=str(val1+val2)
        elif self.ids['SpinAction'].text == '-':
            self.ids['Answer'].color = (1, 1, 1, 1)
            self.ids['Answer'].text = str(val1 - val2)
        elif self.ids['SpinAction'].text == '*':
            self.ids['Answer'].color = (1, 1, 1, 1)
            self.ids['Answer'].text = str(val1 * val2)
        elif self.ids['SpinAction'].text == '/':
            self.ids['Answer'].color = (1, 1, 1, 1)
            self.ids['Answer'].text = str(val1 / val2)
        elif self.ids['SpinAction'].text == '!':
            factor=int(abs(val1))

            for it in range(factor-1,1,-1):
                factor*=it

            self.ids['Answer'].text = str(factor)

    def GetValTI(self,sentVal):
        #remember sentVal is a string!
        if sentVal != '':
            toSendVal=float(sentVal)
        else:
            toSendVal=float('0')
        return toSendVal


class FirstLessonApp(App):
    pass


FirstLessonApp().run()
					# firstlesson.kv

NumLayout:
<NumLayout@BoxLayout>:
  orientation:"vertical"
#adding our first widget
  TextInput:
    id:TI1
    input_filter:'float'
    font_size:"40dp"
#  a spinner is a Kivy style dropdown box
  Spinner:
    id:SpinAction
    text:"Action"
    values:("+","-","*","/","!")
    font_size:"40dp"

#another textinput, like the first
  TextInput:
    id:TI2
    input_filter:'float'
    font_size:"40dp"
#button button who's got the button...notice the on_press event.  IT is not a property.  on your PyCharm screen it
# be a different color.
  Button:
    text:"go"
    disabled:False
    id:ButtonGo
    font_size:"40dp"
    on_press:root.CalculateMe()

  Label:
    id:Answer
  Label:
    id:tradition
    text:"Hello World!"
Your Python Masterpiece- Resize the window and see how everything still fits. Let us know what you want to see next.

