Servers, the mystery meat powering your favorite applications. The way to control these pillars off the internet is often through SSH. We are going to harden access today, while still maintaining an easy password-less access that is safe and System Admin approved. We hear your brain blurting expletives now. How can you be safe without a login password? Not only that, but we are going to make your root account as limited as possible, making it impossible to use to log in. We know it sound ludicrous. Think about it. No login password means you can’t use one to login. Super secure right? So, how do we log in? How do we run a root task if I cannot log in as root?
To start with, you do not need to log in as root beyond your initial setup. After that, you will always be able to access root privileges by using sudo. It is the preferred way as it requires you to temperately ask for permissions rather than always being root almighty. You alternatively may drop into root from any user. As long as you add them to the sudo group. So, you will have access to your most sensitive configurations when needed rather than by default. Thus, you will no longer need root login. The reason is that all hackers, nation states and government agencies, know that username from the start. We all know the username from the start. So, half of the puzzle of logging into a server is then common knowledge, leaving nothing less than your ultra-safe password to brute force hack. That may take time, though their bots have nothing but time.
USER CREATION
After installation of a server, all you have is a root user to log into. We will not cover installation today. First log into your server. Now we will proceed in creating a user.
adduser linuxman
Note, you should change linuxman to the username you wish to create. This way, you will have a user to push SSH keys to in the next section. Furthermore, you will be prompted to answer a few questions. First, you will be asked for the password you would like to use for this username. This will serve as your sudo password for this user. Use something between 16 and 32 characters with numbers and punctuation to promote a strong password. Next you will be asked about user information. You can add this information, if you wish. We will leave it blank and just press enter. Then, you will be asked to confirm if this information is correct. Say yes and then press enter.
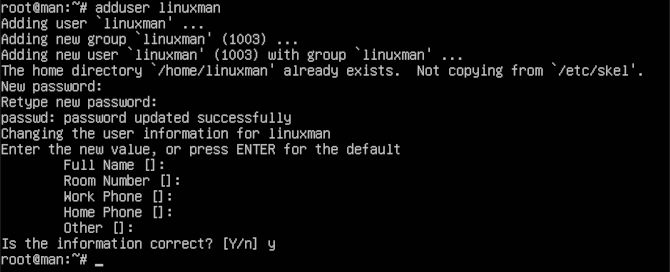
You will also want to add this user to the sudo group. So that you will be able to escalate privileges when needed.
usermod -aG sudo linuxman
Now that we have a new user who is added to the sudo user group. We can proceed with the next step.
SSH KEY GENERATION
First thing we will want is a safe way to log in without a password. Those with experience have probably guessed it. We are going to generate an SSH key on our workstation, then send them to our new user we just created on our server.
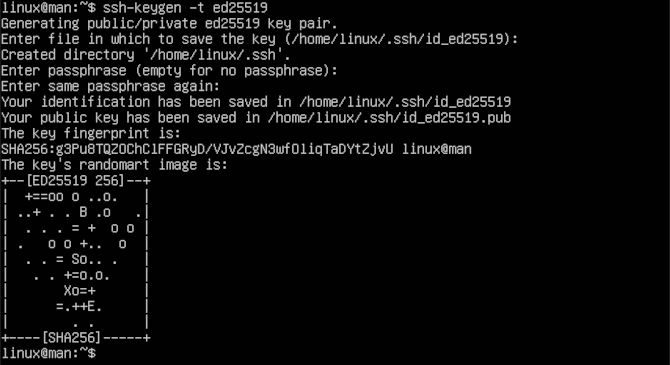
ssh-keygen -t ed25519
Again, you will be asked a series of questions. The first question is directed at where you would like to store your new key set. For the purposes of simplicity, we chose to use the default suggestion. In my case, that is ~/.ssh/id_ed25519. You should change at least the file name every time you make a new key set. This way you will not overwrite any old keys or lose track of your server credentials. Next, you will be asked if you wish to make a passphrase and to confirm it. You can put in a passphrase here if you wish. Note that you will have to keep this passphrase available for later use. We will skip the passphrase by hitting enter twice. Then a fingerprint and randomart image is generated in the terminal readout.
Now we will send the .pub key to our server to ensure our new mode of access.
ssh-copy-id -i ~/.ssh/id_ed25519.pub linuxman@0.0.0.0
Make sure to use your server user and IP in place of linuxman@0.0.0.0 as this is a placeholder. To see the key, you can use the following command to print the continence of id_ed25519.pub.
cat ~/.ssh/id_ed25519.pub
You might need this command in the future to help manually add keys to servers. So, it is a good idea to know where your keys are located.

DISABLE ROOT & PASSWORD LOG IN
In the next step, you will need to be logged into your server as your new user. We will edit the /etc/ssh/sshd_config file to disable root and password login via SSH.
sudo vi /etc/ssh/sshd_config
We will type the letter a, to allow for editing after the courser.
a
You will see all kinds of configuration options. With comments and yes or no options. First thing we will look for is PermitRootLogin on line 34, then set it to no.
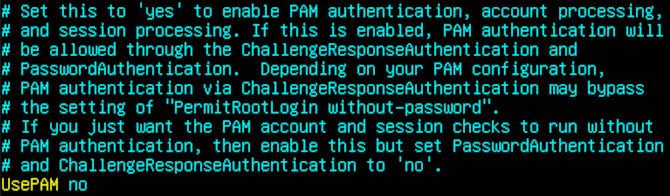
We will want to look for PasswordAuthentication. It should be located on line 58. You will want to uncomment this line by removing the # from the beginning of the line, then change the answer at the end to no. We will give you a few more settings to further harden authentication. We also uncommented PermitEmptyPasswords on line 59, as it is already set to no.

Last, you will find UsePAM on line 86, we will set this to no.
Now we will save and close Vim. First, we type Esc to stop editing.
Esc
Now we type will ZZ to save and close the editor with edits.
ZZ
Next, for the changes to take place, we will restart the service.
sudo systemctl restart sshd
At this point, you will want to open another terminal and test your new SSH key to confirm that it works.
sudo ssh -i ~/.ssh/id_ed25519 linuxman@0.0.0.0
If you encounter any issues logging in, then repeat the steps before logging out of your previous terminal, therefore, maintaining access to resolve the issues. You should be able to run the steps in this section to trouble shoot your issue. If your key is working, then proceed to the next section.
SSH PORT
Now we will change SSH ports, since everyone knows port 22 is the default. Before we do this, we will want to look up a port number to use. We need to make sure that it is not being used by a service already. Let’s go to Wikipedia to see what ports are free to use. You will see that they have tones of free ports. Just pick one. Similar to before, we will access the /etc/ssh/sshd_config file using Vim.
sudo vi /etc/ssh/sshd_config
We will once again type a to allow for editing after the courser.
a
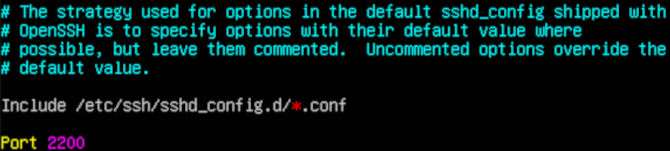
We are looking for line 15 in the configuration file. You will want to uncomment the line by removing the #, then add your number where it says 22. We will replace it with 2200. Now we will save and close Vim again. First we hit Esc to stop editing.
Esc
Now we type ZZ to save and close the editor with edits.
ZZ
Finally, for the changes to take place, we will restart the service.
sudo systemctl restart sshd
Now to test out our port while using our key, open another terminal to confirm that it works. This way you will not lose your current connection.
sudo ssh -i ~/.ssh/id_ed25519 -p 2200 linuxman@0.0.0.0
Now you should be able to log into your server like a professional. You can go pretty far with custom log in configurations. If you have a power key-based window manager like i3. You may want to use a script that gives you a choice of servers. Calling the terminal, loading the SSH key while using the port number you choose, giving you the feeling of some power at your fingertips. If you run into trouble, always try to keep the original connection to help resolve your issues. If you have a cloud-based server that you get locked out of, never fear. Services like Digital Ocean allow you to use your root user to log into a web-based console. This will let you edit your known_host file. This way, you can print your SSH key using the read-out command like in the second section, on your workstation. Then, you can copy and paste it in to your know_host on your server. Then you will want to test your connection again. You can always try to follow through the steps again if you run into trouble. You may run into issues your first time, so do not learn this on a production server. Thanks for reading and remember to SSH safely everybody.