
UFW, the Uncomplicated Firewall, is as true as a command line utility can be. Posing some of my very first challenges managing a server for the first time, I learned by spinning up a copy of Ubuntu on an old computer using a keyboard and mouse for initial setup. This promoted a lab condition that let me learn at my own pace on my network at home, while making learning by failure fruitful. You can also spin up a server on something like Digital Ocean or Linode. Virtualbox is also a very good option to practice. If you are like me and run a server already, this should be a nice refresher.
Now, like everyone, I locked myself out the first time or two. I had to trouble shoot my way out of more than just UFW, I disabled my SSH port. So I will do my best to guide you with some commands. The main thing is to have fun and follow along. I will be using my old friend Ubuntu for the purposes of demonstration. So you can spin up any Debian base server distribution, but for the most part, I believe the commands are similar across distributions. So pull up a terminal, and get comfortable. Next thing you know, you will find UFW as uncomplicated as I do. Let get right into it.
Configure UFW
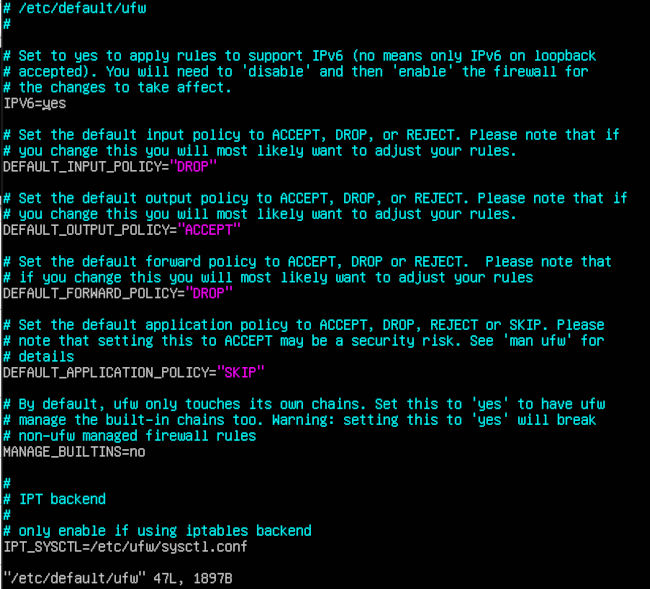
To start, we will use Vim, a text editor, to access the UFW configuration file:
sudo vi /etc/default/ufw
The line we are looking for here has to do with IPV6. We want it to say yes unless you do not plan to use it and know it is disabled.
First, we will demonstrate how to append after the courser. So be sure to get it where you need to edit the answer to yes.
a
Next, will show you how to close Vim without editing.
:q
Last, we will show you how to close Vim while editing.
ZZ
UFW Access Rules
Now that we know that the configuration file has our best interest in mind for our IPV6 settings, we can move on to the next part. We need to learn to set basic rules that will help keep others out and make sure you have complete access to your server. The following commands should only be used on a fresh system to eliminate risk of overwriting previous UFW rules. We will demonstrate how to remove them later in the blog if any issues arise.
First, we will enable port 22 for SSH access to keep connection. These kinds of default rules are fine for your home computers, but they are not likely going to work for a server, as they deny incoming and only allow outgoing. We will want to be able to SSH to our server from the start. The port is always listed as port 22, we will cover in a future blog how to set this port to something undisclosed. So let’s enable this now.
sudo ufw allow ssh
As you can see in the command, UFW can not only recognize port numbers, but also services by name. This is very useful when you wish to use something like Nginx or Apache. That way, you don’t have to go searching for every known port number. Next, will allow HTTP over port 80 and HTTPS over port 443.
sudo ufw allow 80 && sudo ufw allow 443
Next, will show how to allow port 22 from a particular IP. Note, 0.0.0.0 is in place of your own home IP. Please visit whatsmyip to find out your home IP(use your local network IP if using a local server).
sudo ufw allow from 0.0.0.0 to any port 22
Next, will show how to deny port 22 from a particular IP. You can add any IP you wish to deny.
sudo ufw deny from 0.0.0.0 to any port 22
UFW Port Range Rules
Now, we will allow and deny some port ranges in the case that you might want to block a country due to compliance with that country’s laws, for example. If you want a tutorial about blocking hostile IP ranges and subnets using a script and a cidr.txt file, leave comments below. Next, we will show how to allow ranges with protocols included.
					sudo ufw allow 3000:4000/tcp
sudo ufw allow 3000:3040/udp
Next, we will show how to deny ranges with protocols included.
					sudo ufw deny 3000:4000/tcp
sudo ufw deny 3000:3040/udp
When specifying ports ranges with UFW, you need to specify the protocol TCP or UPD rules that should apply. We demonstrated them above because not specifying the protocol automatically allows both protocols, which is OK in most cases. For more advanced cases, you can allow or deny TCP or UPD in line with your commands. Up to this point, we have only been setting up rules we want UFW to use when enabled. We have to enabled it for them to take effect. After confirming you have a rule to allow incoming SSH connections, you can enable the firewall. Finally, we will enable UFW and reload the service.
sudo ufw enable && sudo ufw reload
View and Delete UFW Rules
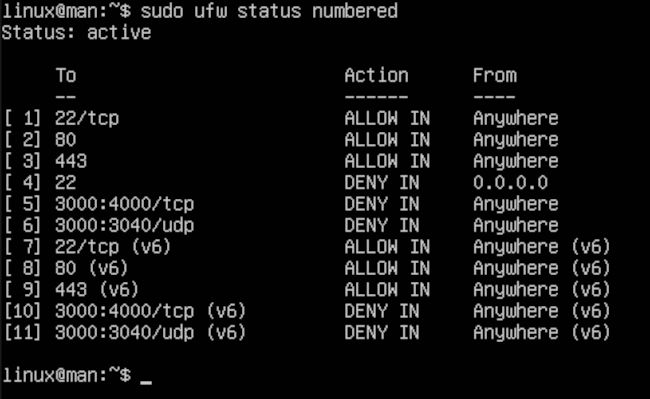
Next, we will show the rules in the list order they were entered.
sudo ufw status numbered
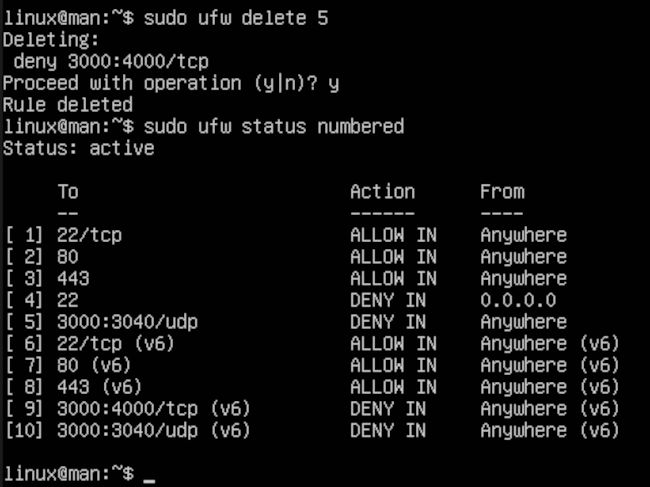
Now, we will remove number 5 from the list.
sudo ufw delete 5
Disable and Reset UFW
To this point, we have demonstrated a few commands. You might want to clean them up, disable them, or reset them all together. This is a great option when you are planning to use the server for something else. Now, we will disable UFW, leaving the server unprotected.
sudo ufw disabled
Last, we will reset UFW to be used again for a future configuration.
sudo ufw reset
Last, we will reset UFW to be used again for a future configuration.
After all is said and done, you should have a beginners’ knowledge of how to control UFW in a server environment. I cannot stress enough, when using these commands via SSH, you will need to maintain access to using that particular port. Otherwise, you will surely be learning the hard way losing access to your cloud server or be it your home lab server. If you ever lose access to something like Digital Ocean, you can use your web base terminal as a backdoor, provided you remember your root login. If you are working in a home lab you may need to re-image your drive, losing any previous progress unless you are able to hook up a monitor and keyboard. This will help you reset UFW, allowing you to start over. DO NOT LEARN THIS ON A PRODUCTION SERVER! Please, that is a ball of stress you do not need. Be kind to yourself, remember we are all learning.


