
So, you think you got a good handle on packages managers? Today we are going to learn about Pacman. One of the more powerful yet safe package managers that we use often. What if we told you that you could manage your packages without touching a command line? What if we could set different levels of involvement? We will show that the proper way is the way you are most comfortable using Pacman. There are several things that can make it more enjoyable or perhaps more powerful an experience for different user levels.
So, the first thing we will do is cover basic Pacman usage, this way you will have an understanding of what we are doing. We will then cover how to set up alias for common commands that we just don’t want to type out. Next we will introduce some scripts that we can then automate with the use of Systemd, making running Arch or any Systemd based distribution much easier to use. So if you would like to choose your level of involvement yet never miss an update then you’re in the right place.
Basic Usage
You may already know how to use Pacman, but we are going to go over the basic usage as we will be using the commands in the coming sections. To update is pretty straightforward, but we will try to help uncover anything that seems mysterious.
sudo pacman -Syu
Pacman requires root access to run, so always make sure your user has the privileges to do so. As does anything that may alter your system. Following this, Pacman is syncing all of our packages. To install a package would look something like this.
sudo pacman -S package_name
Here we require root privilege again. Next we are calling Pacman to sync the binary package that we would use rather than “package_name”.
sudo pacman -R package_name
This command is similar at the start, we will assume all Pacman usage requires root. Next we are using Pacman to remove the “package_name” that you no longer wish to use. This works great for single packages. But what if you want to remove a group like Gnome, what then? Normally, you will get a message that tells you that x number of applications depend on what you are trying to remove. Make sure you really would like to remove the group. We will proceed with Gnome.
sudo pacman -Rcc gnome
This will actually remove every package that a Gnome installation provides which is actually many applications. So, you may want to take note of them to install them once again in the future. This command will help purge Gnome completely. You can do this with other groups as well.
Alias
Now we may want to use those commands in a more condensed way. Perhaps you would like to update by simply typing up. Now let’s edit our bashrc to make this possible.
vim ~/.bashrc

The next thing we need to do after opening the file is scroll to the bottom. We like to do so for ease of use. We can always cat our bashrc file and see without scrolling what our alias is to help us remember.
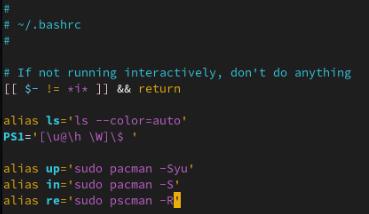
					alias up="sudo pacman -Syu"
alias in="sudo pacman -S"
alias re="sudo pacman -R"
Now we can hit Esc to stop editing,then type :wq to write and quit the file. Now we need to source the bashrc file to see the changes.
source ~/.bashrc
Here we added the update command to update your system with a short easy command. That is right, it is that easy. All you do is add a command in quotes and whatever alias you want to represent that command. The usage would be as follows.
up
This will update your system with no issues, and you will see the updates as they go by. You will also be prompted for your user password.
in gnome
The alias package group name will install your desired packages. Yes, you will still need to use your sudo password to install packages this way.
re chrome
The alias package name will remove your desired package. This is nice when you want to know what is going on. Being hands-on to some degree will help you make good decisions about updates, understanding what to troubleshoot if something goes wrong. You may notice we did not add the command to remove a package group. You can do this if you like, it is just a decision that you want to think through. So, you might want to make your alias all caps to represent the finality of the package removal.
Scripting
The next thing to upgrade your Pacman experience would be to script some things out. Like you might want to upgrade in sync with another Pacman process. Perhaps you would like to set such a thing to a timer. We will go for a scripting style that works with more than just BASH. We will be making these scripts POSIX compliant.
mkdir ~/.bash/ && mkdir ~/.bash/bin/ && vim ~/.bash/bin/update.sh
Now we will add the following script to update your system.
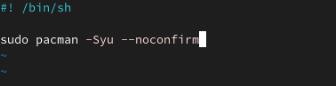
					#! /bin/sh

sudo pacman -Syu --noconfirm
Now we can hit Esc to stop editing, then type :wq to write and quit the file. Now we need to make the script executable.
sudo chmod +x ~/.bash/bin/update.sh
The POSIX compliance comes in with the first line. The #! is pointing to the /bin/sh location. This will ensure that your script will run as long as your Shell is POSIX-compliant. For example, Fish is not compliant, where BASH and ZSH do work with the POSIX standard. Next we get to the command itself. We are still using root privileges. We are also using the same system update command as before. The main thing that is different is we made it so you don’t need to approve the package changes. Streamlining your experience. We do advise that you use the linux-lts kernel when not confirming updates to help keep you on a more stable release. Now, what if we want a script that preserves our Pacman scripts for system configuration backups.
vim ~/.bash/bin/pac.sh
Now we will make a record of our packages that we can retrieve later in a dot file.
					#! /bin/sh

pacman -Qe | awk "{print $1}" > ~/.pacman_packages

Now we can hit Esc to stop editing, then type :wq to write and quit the file. Now we need to make the script executable.
sudo chmod +x ~/.bash/bin/pac.sh
Similar to before, we are making this script POSIX compliant. Next we are
calling Pacman with the -Qe switch to tell us all the
packages that we have installed for our system to run how we have it
currently. We are then piping that into awk and shortening it to
the package itself and the version number, while then printing it to a file
called .pacman_packages. Giving us a file to back up our
Pacman package list.
Systemd
Now to make this even more hands off. We will set up some timers that will launch our scripts that we just made. You could configure them to a crontab, but we are going to use Systemd itself to update our system on the regular. First we need to write a service.
sudo vim /etc/systemd/system/update.service
Now we can add the following to help us automate the update process.
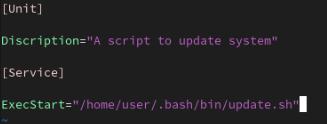
					[Unit]
Description="A script to update system"

[Service]
ExecStart=/home/user/.bash/bin/update.sh
Now we can hit Esc to stop editing, then type :wq to write and quit the file. Notice that under [Unit] we have the description. Below this under [Service] we are executing our script in its path location. We are using ~/.bash/bin/ to store our scripts. You can store them anywhere you wish including /usr/bin/ but it can be hard to sort them out from the ones your user needs for applications. So for simplicity we will store them in a dot directory in our home location. The next thing to do is add a timer to call the service.
sudo vim /etc/systemd/system/update.timer
Now we can add the following to set the timer to update process.
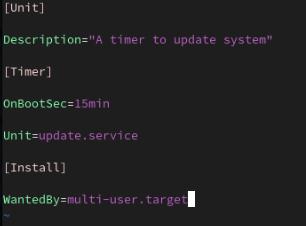
					[Unit]
Description="A timer to update system"

[Timer]
OnBootSec=15min
Unit=update.service

[Install]
WantedBy=multi-user.target
Now we can hit Esc to stop editing, then type :wq to write and quit the file. Finally, we will need to enable both the service and timer.
sudo systemctl enable update.service && sudo systemctl enable update.timer
Once you reboot your system this will take effect. So don’t be alarmed if you see your system resources spiking a little when the timer set triggers our service. You have the tools to be as involved with Pacman as you wish. Giving you the privilege to run the commands stock character by character or like a gray beard, using Systemd to update your system for you. Thanks for reading.


