Today we are going to start out with a base installation of Arch Linux. This can be done in 20 minutes on a good connection when nothing goes wrong. So, we will be starting with nothing more than a console to log into and enough packages to build whatever we need. Arch was built from scratch to be very lightweight and versatile. Making Arch the one distribution that does not make you compile it, with the most choice. If you have had bad experiences asking newbie questions, then this is the place for you. No one should feel discouraged about technology. So feel free to ask us anything in the comments!
First we will start by creating a user. Next we will go over updates in detail
as pacman can be very different. We will cover how to install a
DE (Desktop Environment). We will also cover how to install a WM (Window
Manager) since you can have both or choose between DE/WM. Furthermore, we will
go over how to install Xorg to get the startx command to
function, so we can start our new DE/WM. Finally, we will set up console log
in, then move on to set up a DM (Display Manager) if you prefer this
alternative. We will make sure to give you some choice here, as you are the
one that should come up with your own opinion of how to use your Arch spin. So
get out your VM box of choice, start up your base Arch installation and let’s
get to keyboard clacking!
User Creation
The first thing to do after an installation is set up your user and user privileges. We will create the user and the home directory all at one while adding our user to the wheel group.
useradd –mg wheel linux
You can see we used useradd as that is what is available on Arch.
Next we used the -mg switch to create the home directory and add
the wheel group. Next we specified the wheel group, and then we
added the user Linux. You would make this whatever user you like. Now we need
to elevate the wheel group’s user privileges.
vim /etc/sudoers

You can see we scrolled down to the wheel group that was commented out. You can uncomment this and hit Esc then :wq to write then quit the file. The next thing our new user needs is a password.
passwd linux
This will ask you for a password twice to confirm. Then you can log into your new user. Just type exit. Then go ahead and log in to your new user.
Pacman
Pacman is the first thing to go over since it is very different from some
other package managers. The first thing you may notice the most after the
package manager name we will be using –S for sync or to install a
package, –R to remove a package, and a few other commands. This
is much different from other package managers like DNF where you can just say
install or purge. We will start by
speeding up pacman. To achieve this, we will edit
/etc/pacman.conf.
vim /etc/pacman.conf

Type a to edit. You will want to scroll down to find parallel downloads and uncomment it. Then you can add a number like 10, as we have here. This will allow more package downloads at once. You can then hit Esc and type :wq to write and quit the file. Next we will go ahead and update.
sudo pacman –Syu
You should notice packages downloading in parallel of 10 at a time. This is
nice when you don’t want to wait too long for updates. To get a full list of
pacman commands and explanations try this.
pacman -h
Graphical Environment
Most of the time people boot up Arch for the first time, and they are just looking at a console. For someone new this can really be a tough way to start. So, we will go over two ways to upgrade your graphical experience. First we will help you install Gnome because it comes with a complement of applications that make your experience smooth. Especially if you came from Ubuntu or Fedora. Let’s get it done.
sudo pacman –S gnome

You will notice that you will have numerous applications to approve. This is not the lightest DE, but it is well-developed and has a lot of documentation found here. Next we will talk about i3WM. We don’t need to choose between the two as you can log into either using a display manager like GDM which comes with Gnome. In fact, if it is your first time installing a window manager, then you should just install both. I3 will take some extra steps to make work like you might want. Having a full complement of productivity applications will help, as Gnome is full-featured. So let’s install i3WM.
sudo pacman –Sy i3
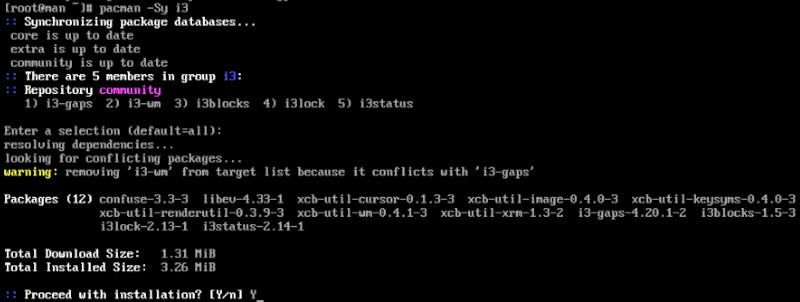
You will be given numerous choices like i3 or i3-gaps. This is up to you. We will go with just i3-gaps and use all the defaults during the installation. There are too many i3 tips that we can give you for one blog. So, we will write all about i3 in the future. Until then, you can look at the documentation located here.
Xorg
Now we will want to install more Xorg packages, as you may have noticed Gnome
comes with some already. We will add the xorg-xinit package. This
package will help us control how we boot into our new DE/WM.
sudo pacman –S xorg-xinit
Before we do anything else, we need to copy over xinitrc to our
home directory like so.
cp /etc/X11/xinit/xinitrc ~/.xinitrc
Go ahead and edit xinitrc to add whatever you would like to start
your system with Gnome or i3.
vim ~/.xinitrc
Type a to edit. Now we want to delete the last 5 lines or so and add one of the following two choices.
					exec gnome-session
#or
exec i3

You can then hit Esc and type :wq to write and quit the file. Now if you wish you can use the following command to start your DE/WM.
startx
This command should start the environment you selected in your
xinitrc file.

Log In Management
Now we need to decide how we would like to start our system. You can keep it
how it is if you would like. Logging into consoles and then typing
startx is a few more steps than many would like. We have a few
choices beyond this. We will go through each in detail, so you can make an
informed decision. So, you can choose what you want for your system. My
preferred method is console login straight into my WM. First we need to edit
our .bash_profile. If you do not have one we can just create it
the same way.
vim .bash_profile
Type a to edit. Now we need to add the following to get our system to boot after console login.
					if [ -z "${DISPLAY}" ] && [ "${XDG_VTNR}" -eq 1 ]; then
  exec startx
fi
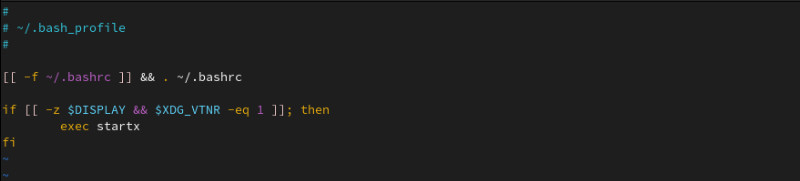
This piece of code will launch startx as soon as we log in. Now
this is good for one DE or WM. As it will start that just fine with no
problems. If you wish to try out other DE like LXDE, LXQt, Xfce, and so many
more that can be found
here, then you may want to use something like GDM as we will be using here or
Light DM. The package was installed if you chose to use Gnome. If not just
install GDM like so.
sudo pacman –S gdm
Now we need to enable the service and then start it, so you can see your new login screen.
sudo systemctl enable gdm.service && sudo systemctl start gdm.service

Bonus
We wanted to give you a little more information to help you with package
management. First we can add some fun to our updates and package installation
by letting you in on a little Easter egg. We can add some fun by opening our
pacman.conf file again.
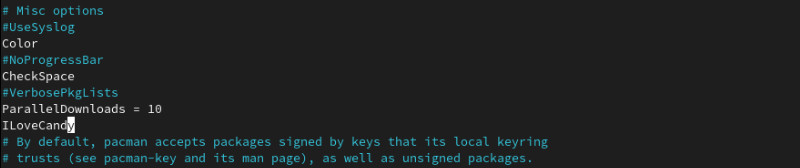
vim /etc/pacman.conf
Type a to edit. Now we should find the spot where we
uncommented and used parallel downloads. Above it should be
Color. Uncomment Color, then make a space under it
and add the following.
ILoveCandy
To see what we did. We will go ahead and install the AUR (Arch User
Repository) helper application called Yay.
sudo pacman –S git && git clone https://aur.archlinux.org/yay.git && cd yay && makepkg -si
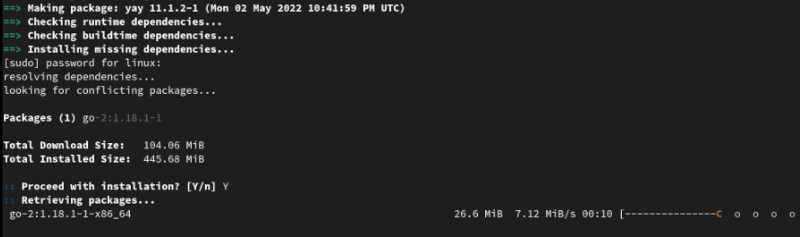
You should see the effects of our previous file edit now. Can you see the pacman? Now you can proceed to install whatever package you would like to try out. You can update every week to make sure you don’t fall too far behind on updates. You don’t want to miss any patches. One thing about using Arch is learning to read documentation. Try not to just copy and paste stuff in like a script kiddy. That approach will not serve you too well. Take your time. Then test what you need as not every single example there is on the page. Arch can be molded to the user’s will, down to build uses, look and feel. You have so many choices that you should take your time and just let your Arch spin evolve naturally. May the Arch be with you. Thanks for reading.