ArtixLinux is a Arch Linux based distribution whose focus is being systemd free. It follows a rolling release update schedule. What does that mean? For those not in the know, I’ll summarize the issue here. systemd is a software suite that manages the services that forms the backbone of a Linux system. In other words, it is the first process that runs, and from where all the other processes spawn. Critics of systemd argue that systemd creates bloat, is inefficient. It also makes a system more vulnerable to attack. This is problem for a specific set of people, but getting into the issue is beyond my interest. This will be more of a personal experiment in what not having systemd will be like.
Which version of ArtixLinux to choose?
ArtixLinux comes in a few flavors:
- Base — allow for total customization, only having a terminal at your disposal and requiring all your Linux wits to survive.
- Graphical — provides a reconfigured desktop environment of your choice (LXQt, LXDE, MATE, Cinnamon, KDE/Plasma, Xfce, and a basic set of programs, like a file manager, web browser, and a graphical installer.
- Community — comes with a general suite of tools for desktop use, the full list is here. It comes in either in GTK or Qt with either MATE, KDE, LXDE, and LXQt.
I’m gonna go all in and jump into base, but before that I have to make this decision: which init system should I choose? Artix offers dinit, OpenRC, runit, s6, and suite66, for each of its editions:
| OpenRC | dinit | runit | s6 | suite66 | elogind |
|---|---|---|---|---|---|
dependency based init system. |
portable init system with dependency management. |
tool suite that provides an init and daemon spawning. |
a process supervision suite with init. |
wrapper for s6 written for ease of use. |
stand alone version of logind. *see note |
I chose OpenRC because it looks to be the most-well documented, and I’m a sucker for documentation. Having never installed a distro quite like this before I’m going to preform a dry run on a virtual machine. That way I won’t wreck my actual desktop. I recommend having a glance over of the ArtixWiki’s installation guide, linked here. It covers all the components and provides a overview of the syntax for each of the above init managers. I’m not gonna lie, trying to use the ArtixWiki as a noob, might be challenging. Make sure you have at least a couple of hours to sit down and tackle this installation. Especially so for any first-timers out there.
Installing ArtixLinux
I created a virtual machine with 2 vCPUs, and 2GBs of RAM and a 30GB vHDD, if you want to follow along.

Keymap and Network
					ls -R /usr/share/kbd/keymaps # use a pipe to make it more readable: | less
loadkeys us #or your own region
Next test your network as the following steps need a internet connection. Wired connections get discovered automatically during setup. If you are on a wireless connection, you’ll have to jump through a few hoops to get it setup. You’ll need the dhcpcd & wpa-supplicant packages so install those as needed. I won’t be covering them here.
To verify our network works we’ll ping the ArtixLinux website 4 times.
ping artixlinux.org -c 4
Partitioning ArtixLinux
Before we install ArtixLinux we need to partition the hard drive, you can use fdisk or cfdisk, but we’ll use cfdisk here. When you first boot in from your installation media, you’ll want to login as root. The default username and password is:
| Username | Password |
|---|---|
root |
artix |
First let’s check out the name of our harddrives using lsblk.

cfdisk /dev/vda
You should see a window like this take over you command line:

If your hard drive exceeds 2TB than go with GPT. It is the modern standard and it supports disk drives over 2TB, otherwise it is safe to use DOS. The other 2 options are for compatibility with older SGI & SUN systems. As I am using a VM, and my disk drive is under 2TB I’ll go with the dos hard disk label. Once inside cfdisk, you’ll encounter the screen below:

From here we’ll need to create our partition table. We’re going to be creating a simple partition scheme of consisting of the following:
/mnt/boot(for the bootloader)./mnt(where our system files & packages will go)./home(for our user files).
I’ll be omitting the /swap partition as I have a NVME drive and 16GBs of RAM, so I don’t need a /swap. According to the ArtixWiki, the boot partition is necessary on UEFI systems with a GPT disk. It should get created and mounted at /mnt/boot with a suggested size of 512 MB. 512MB is a tad overkill. You could go as low as 128MB for modern boot partitions, but to follow the docs, we’ll go ahead and use 512MB. To create this partition in cfdisk select [ NEW ] with Free Space selected. Type 512M, choose primary and press enter. Once it’s created, use the arrow keys to select the bootable option. Then press enter to mark the current partition as bootable or press “b” on your keyboard.

Next create 2 more partitions as you see fit with the remaining disk space. I used 12GB for the partition I intend to use as /mnt/ and the remaining 17GB for /home.

Now using the arrow keys, select [ Write ] then press enter. cfdisk will prompt you with “are you sure” then type yes and press enter. Finally exit cfdisk by selecting [ Quit ].


If you need a swap partition go ahead a make one here before you write the changes and exit.
Formatting ArtixLinux
Reminder to use the output of lsblk as reference, as the drive names will be different on an actual machine.
					mkfs.ext4 -L BOOT /dev/vda1 # 128-512MB
mkfs.ext4 -L ROOT /dev/vda2 # typically 15-25GB
mkfs.ext4 -L HOME /dev/vda3 # The remainder for home
#mkswap -L SWAP /dev/vda4   # swap partition (if created)
If you are doing a UEFI installation, the boot partition needs to be formatted as fat32. Since this is a VM, formatting as ext4 is okay.
					mkfs.fat -F 32 /dev/sda4
fatlabel /dev/sda4 BOOT
Once that is done, we need to mount our newly minted partitions.
					#swapon /dev/disk/vda4        (if created)
mount /dev/vda2 /mnt
mkdir /mnt/boot /mnt/home
mount /dev/vda1 /mnt/boot
mount /dev/vda3 /mnt/home
Installing the base system and kernel
Next is the real exciting part where we install the base ArtixLinux system. The basestrap command will install the following to the the /mnt directory:
- base (main OS packages).
- base-devel (software compilers and other developer tools).
- The Linux kernel and firmware packages.
openrc (the init system). - elogind wrapper for openrc.
- Vim (a text editor). You may choose to sub nano for vim if you prefer.
Optional: For a faster download, edit the /etc/pacman.d/mirrorlist file. This is the list of ArtixLinux repos that pacman uses to pull software from. Move the mirrors that are closer to you near the top and save the file.
basestrap /mnt base base-devel linux linux-firmware openrc elogind-openrc vim
Note that at this point you can install any init system you want to, instead of openrc. ArtixLinux also offers 3 different kernel options. linux, linux-lts, and linux-zen, for you power users out there.
Quick Vim Tip! press i or a to enter INSERT mode, the hit ESC to exit INSERT mode and the type :wq to save and exit.
Using nano or vim , edit the /etc/local.gen file. Un-comment whatever localization you need.
					#ONLY INSTALL ONE OF THESE!
#runit
basestrap /mnt base base-devel linux linux-firmware runit elogind-runit
#s6
basestrap /mnt base base-devel linux linux-firmware s6-base elogind-s6
#suite66
basestrap /mnt base base-devel linux linux-firmware 66 elogind-suite66
#dinit
basestrap /mnt base base-devel linux linux-firmware dinit elogind-dinit
Preparing fstab:
Next generate the fstab file. This defines how disk partitions and other file systems get mounted by the system. The -U flag will use UUIDs or you could use the -L switch to instead use partition labels.
fstabgen -U /mnt >> /mnt/etc/fstab
Now the next following commands need to be done from Artix’s chroot tool.
artix-chroot /mnt
Configuring the system
Setting the system clock
While in the artix-chroot shell, set the timezone. You’ll find it helpful to check out the contents of /usr/share/zoneinfo/ to find out the available regions.
					#ln -sf /usr/share/zoneinfo/Region/City /etc/localtime
# for example:
ln -sf /usr/share/zoneinfo/America/Tijuana /etc/localtime
Next we run hwclock to generate the /etc/adjtime, which if you run cat it will give you a timestamp:
hwclock --systohc
Localization
We next need to install the default language(s) on the system. To see the available options edit the /etc/locale.gen file.
vim /etc/locale.gen
In my case I’ll uncomment lines #178 and #179, for US English.

Next run the following command to generate your locales.
locale-gen
Finally create the /etc/locale.conf file to create a system wide preference, just replaced LANG= with your preferred locale.
touch /etc/locale.conf && echo 'LANG="en_US.UTF-8"' > /etc/locale.conf
Installing the Boot Loader
We now must install grub and os-prober. This is a tool for detecting other installed operating systems, this is optional if on a vm. Following that, run the appropriate grub-install command, (if I was on my desktop I’d use the one for UEFI. Finally we will run the grub-mkconfig command. This generates the correct boot entries in grub.
					pacman -S grub os-prober efibootmgr
#run ONLY 1 of these grub-install cmds NOT BOTH.
#FOR BIOS
grub-install --recheck /dev/vda
#for UEFI
grub-install --target=x86_64-efi --efi-directory=/boot --bootloader-id=GRUB
#generate the grub file
grub-mkconfig -o /boot/grub/grub.cfg
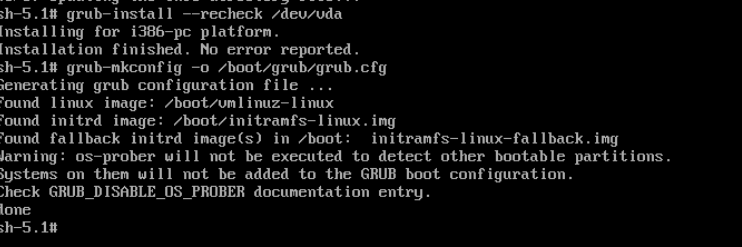
You can safely ignore the warning messages regarding os-prober for now.
Creating our user
First run passwd to set the root password. Then create and configure a new user and add them to the wheel group to give them sudo privileges :
					# set root pw
passwd
# add new user and set their password
useradd -m linuxman
passwd linuxman
usermod -aG wheel linuxman
This next step is optional as it is a quality of life setting. Visit the /etc/sudoers file to uncomment line #82. This line allows any user that is part of the wheel group able to execute any command. You can also uncomment line #85 to execute any sudo command without having to enter a password. This results in a much less secure system so proceed with caution. Then create and configure a new user and add them to the wheel group to give them sudo privileges.
If using vim, exit with :wq! to save a read only file, or with sudo privileges if you get an error saving your edits.
vim /etc/sudoers

Network configuration
Next we need to create the hostname file and enter your desired hostname.
vim /etc/hostname
Then add matching entries to the /etc/hosts:
					vim /etc/hosts
# enter this
127.0.0.1        localhost
::1              localhost
127.0.0.1        myhostname.localdomain localhost
If you also chose to install openrc you must add your hostname to /etc/conf.d/hostname too:
					vim /etc/conf.d/hostname
hostname='myhostname'
And install a network manager and a DHCP client. Failing to do so will result in a internet connection failure on reboot.
					pacman -S networkmanager networkmanager-openrc #or respective oen for your init
pacman -S dhcpcd # or dhclient
With that done, logout of the chroot shell and reboot. Congratulations you’ve installed ArtixLinux!

Conclusion
If you’ve been following along on a virtual machine, here is where I recommend creating a snapshot. This is So you can go back to a fresh ArtixLinux install in case something goes sideways. You never quite know what will happen when installing a window manager or whatever. I also heavily recommend running through this process a few times as needed. Get comfortable with it before you try installing it on any actual hardware. Post-installation set will needs to get done. For example, you need to set up a window/display manager, etc, but that is a post for another day. Go get yourself a treat and pat yourself on the back because that was pretty involved! Way more in-depth and terminal heavy than any other distro installation I’ve ever done, for sure. Now excuse me, I think I need to go lay down..