Python, everyone’s best friend. This is because if you are reading this on your Linux distribution, you are likely using Python in some way right now under the surface. This is because many distributions depend on the dependability and robust nature of Python. One of those features is module installation. Being able to install a library written to work with a particular need. In some cases Django is something you might need, which is arguably the best Python web framework. Sometimes you may need to crunch some numbers with Numpy. Other modules may make it into the standard library.
What is so important about installing modules is what we mentioned earlier. Linux’s distributions and some other operating systems depend on Python to get stuff done. To make our own program, we will need to make an ENV(environment) that we will then use to house our modules. This will separate our system from our projects. Perhaps it will separate a script you just want isolated. Today we will install modules and demonstrate a few uses. Then we will show you a way to package your modules and freeze the requirement. Last, we will show you how to make sure you’re using the right ENV for your application. Effectively isolating your system, making for a much smoother time. Now we will just get right into it.
Installation
If you are a Python newbie or a seasoned professional, installing Python packages is part of the experience. Sometimes as a newbie you give up on using an ENV, making your experience faster. This will lead to system package bloating on your Linux distribution. We will install the needed packages to our system to get access to Python responsibly. We will cover how to install and use PIP and VENV. Next we will show how to do this on Arch and Debian as they actually differ a bit more than just package managers.
Arch
					sudo pacman -Syu && sudo pacman -S python-pip python-venv

mkdir ~/test && cd ~/test && python -m venv env
Debian
					sudo apt update && sudo apt upgrade -y && sudo apt install python3-pip python3-venv

mkdir ~/test && cd ~/test && python3 -m venv env
Now you will notice that in Arch you don’t need to mention Python3, rather if you wanted to use Python2. Making it future compatible. In Debian mentioning Python3 is still part of the deal, at the time of this blog. We made a directory to test named “test”. Next we created our environment named “env”. You can name the env after your project, or perhaps version number or date. Just know that you will be typing it here and there. So, a shorter env name is good, or just going with tradition and just use env, may be the way to go.
ENV
Now that we have our environment inside our test directory we can get started. The first thing you will want to do is start the environment.
source env/bin/activate

You will notice that your terminal prompt may have shifted and has an (env) at the start of it. We can also use this environment while deploying the script or application. The way to do this is by adding a little-bit to the end of your start command. For example, this could look something like this.
Arch
python ~/.test/python_script.py ~/.test/env/bin/python
Debian
python3 ~/.test/python_script.py ~/.test/env/bin/python3
In this case, you can add this to a crontab, or in other words automate the command and used the intended environment as to not add to your system Python resources.
Modules
Finally, we get to what the blog is about, Modules. It is just a fancy way to refer to a Python package, as a module in any programming language can be reused and added to other projects. On PYPI you can find all kinds of interesting community packages of such modules. With our environment still activated from before, we will install Django
pip install django
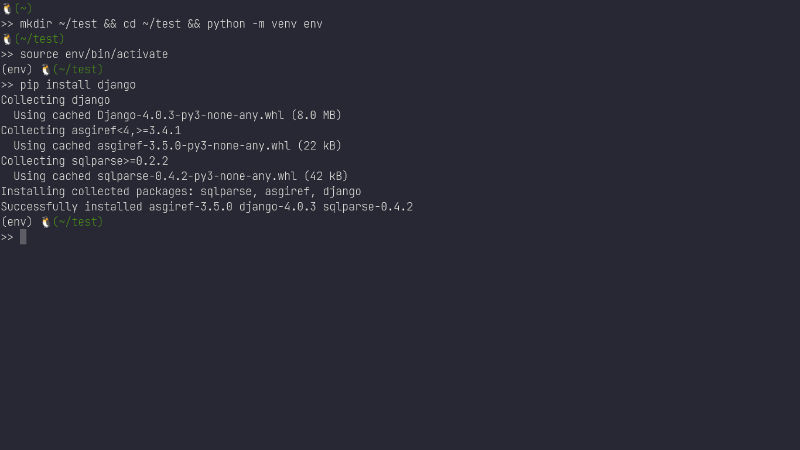
As you can see, PIP is the package manager we installed before. We are setting up Django for our mini project. You notice I have this installed, so it is installing from local sources. We should now save our package list in our requirements.txt.
					pip freeze > requirements.txt

cat requirements.txt

This will write all the package names and versions to the mentioned requirements.txt file. So you could actually use the file to install the needed packages for our installation. If you see packages you did not install, make sure your environment is activated and try again.
Mini Project
We figured why not give you a single paged application to help you learn about Django. This is not how you would set up a production Django server. But you can test things out with it. Let’s make our file.
vim main.py
Now we can paste in the file provided. Using Vim you can paste stuff in without hitting i or a first. You can use your right click menu to paste the code in, or you can use CTRL+SHIFT+V.
					#single page Django app

import sys
from django.conf import settings
from django.core.management import execute_from_command_line
from django.http import HttpResponse
from django.urls import path

settings.configure(
    DEBUG=True,

    SECRET_KEY='django-insecure-=jk@pjetbp)72#$6eu3)9-!*52fampcgr#!yvjk',

    ROOT_URLCONF=__name__,
)


def index(request):
    return HttpResponse('<h1>Hello linuxman.co readers!</h1>')


urlpatterns = [
        path('', index),
]

if __name__ == '__main__':
    execute_from_command_line(sys.argv)
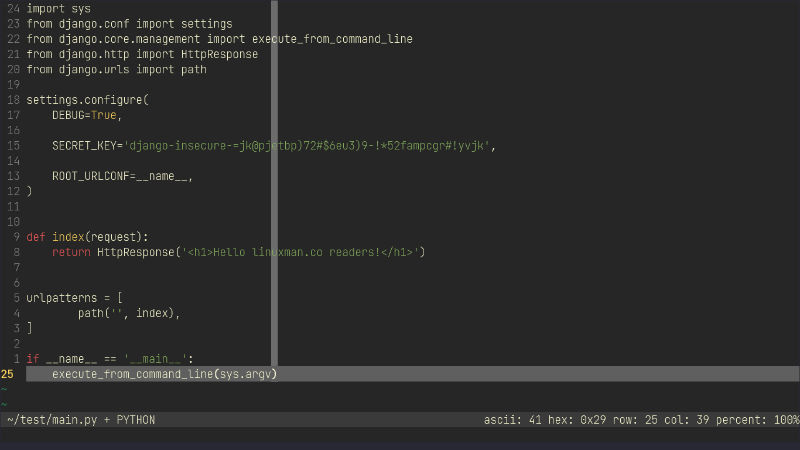
So we will focus on the package imports mostly for explanations. In the top section of this code we are importing the system. By the way sys is part of the standard library, so we don’t have to install it. Its part of Python. So as you can see, modules are a big part of Python. Next we have four imports from our Django package. You can see that they are in several directories since we are using django.dir_name in our imports. Pulling all the appropriate modules to help complete our code.
We are then using the setting import, referenced in the import
section. Here we are specifying debug mode. As Django will let you know when
something is not ready for production if not set this way. Next we have a test
secret key. You can generate your own rather easy with a short Python script.
Then we are defining the root URL as __name__. A lot of these
pieces would be on separate .py files inside your application when running for
production. However, this is a hello world type test application. Next we are
defining our index. This method looks rather like a React way to write HTML
inside Python, rather than JS. Next we are defining our URL path. Then we wrap
it up with if __name__ == ‘__main__’:. Making sure to run it
in terminal. Make sure to hit Esc, then you can type
:wq to write and quit the file in Vim. Now we can go ahead
and try it out.
Arch
python main.py runserver
Debian
python3 main.py runserver

Now we can open the URL inside the terminal.

You have created your first Django project! When you are done testing and running the project you can hit CTRL+C to stop our project from running. You will want to use the following command to exit our environment.
deactivate
Finally, you are done. You can start your environment, install modules and better still you have a fun demo test application to play with. Make sure to play with Python. No need to worry about learning in a traditional scene. You want to play with code that has fun results at first. This way you can get comfortable reading the code. Then as you start to understand, you can start thinking of application ideas. Might take a few months or a year, so be patient when learning Python. It is a great first language based on C, as are so many modern languages. So, you will get a good introduction to the patterns you will see in most languages. Just think of what you could accomplish. Thanks for reading.