My tar skills are rusty, oftentimes I’ll opt for binaries/packages, or even a snap before I resort to a tar file. Sometimes, you don’t always have that option, say for example, you want to install your favorite messenger app, Telegram or your favorite VOIP program Discord on your Linux distro—guess what, pal? tar files, specifically tar.gz files, but tar files nonetheless, sitting in your downloads folder, being all mysterious. Don’t even get me started on tar commands—I could never remember the exact combination of letters. Point is, I’ve been a bad Linux user, but no more! We are all about learning here at linuxman, and what better way to change computing habits than by learning a new tool!
A star is born
star is a tar file archiver, created in 1982 to extract tapes from UNIX machines that had no tar command. It’s first full functional release was in 1985, named mtar, it was then renamed a couple more times before finally settling on star (standard tar) in 1994. Old stuff, older than I am, but the cool thing is that tar is still very much used even though the “tape” aspect has long since gone way. Star also claims in its man pages to be the fastest tar archiver with several improvements over tar, I’m summed up the key ones here, but you can read the full list here on their man page (be forewarned as its a doozy):
- Star has no limitation on filenames
- automatically recognizes the type of the archive, so it can handle it accordingly.
- is POSIX compliant. (Which just means that it works with and can generate different specifications of tar files that are compatible across UNIX systems).
Installation
For Arch
Here’s how to install yay on Arch
sudo pacmac -S yay
yay -S star
Now go get a snack because yay will have to build star from source, which will take a few minutes or so. Once star is compiled and installed you are ready to start working with it.
For Fedora\RHEL
					sudo dnf install yum
yum install star
Usage
Now before we get into the nitty-gritty, we’re gonna need some data to work with. Let’s create a mock directory with some dummy files to get handle on star.
mkdir targetDIR && touch targetDIR/file{1,2,3}
Once you have the files created the first thing we can try with star is compressing this whole directory. Here’s the bare syntax to give you an idea of what a typical star command will look like.
star -c -f=destination.tar filetoarchive.text
Not too crazy, once we have the context of what the flags do, we’ll really be cooking with gas.
Archiving
star -c -f=target.tar targetDIR/
The -c flag here is telling star to create tar file , -f is specifying the name of the destination file and then finally at the end we specify what we want to put into the star archive. star should return some text output, indicating successful file creation.

If you ls your current directory you’ll see our newly minted tar file, ready to be sent off to wherever we need it.

Right now, let’s go ahead and move target.tar to Documents. We’re moving it to another folder to extract because we don’t want to overwrite the original files or you could just use remove the original directory. It’s up to you.
mv target.tar Documents/ && cd Documents/
Show contents of tar
We wouldn’t be smart server admins if we didn’t check the contents of an archive before extracting it, so let’s use star to check out what’s inside this tar file, using the -t flag, which lists the contents of the tar file.
star -t -f=html.tar
You can also add a -v again to list the output in a fashion similar to ls -la, which gives you extra information such as file ownership/permissions, creation date, etc.

Extracting
To extract a tar file using star, run the following command:
star -x -f=target.tar
star will then extract the contents of this file in the present working directory, and just like that you’ll see its contents in your directory. You may add a -v flag to get a verbose output like so:
star -xv -f=target.tar
Adding files to archives
Now let’s say we wanted to add a file to this archive as an update, first let’s create it with touch again:
touch file{4,5}
Then we will use star on file4.
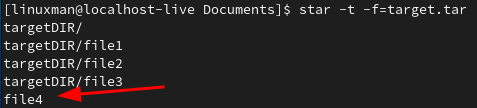
star -u file4 -f=target.tar
The -u flag will add the specified file to the end of the tar archive, be aware as you can only add to uncompressed tar files, if you try to add files to a compressed tar then star will throw an error. Run -t on target.tar to verify that file4 was added to the archive:
star also has a -copy option that can copy files into targeted directories before you tar the entire directory. An example of this is as follows:
star -copy file4 file5 targetDIR
If you check the target directories contents you’ll find that both files now reside there. From here you could then compress this entire directory using the -bz or -z options. Which runs the tar file through a bzip2 pipe which will compress it along the way, resulting in a slightly smaller file size. An example of this is shown below:
					star -c -bz -f=target.tar targetDIR/
#OR
star -cz -f=target.tar targetDIR/
Conclusion
With that, congrats on the working star knowledge! This was just a tip of the iceberg when it comes to using star, if you want the full picture, (and a huge time sink) read the man pages. You will definitely lose a day just reading all the options and outputs. Having just dipped my feet into star, I can already see how useful it could be just to transfer files on and off a server or using it to create backups in concert with something like rsync.