You ever wonder how to monitor your server without having to SSH in and cat all your individual logs? Today’s blog is all about just this capability. Monit is a local service that offers many ways to receive your data. Making it one of the tools all system administrators should be aware of. Coming to popularity in 2011 with the Ruby web server community, Monit seems to have been around for about ten years before this, as their site has a copyright going back to 2001. Monit is written in C, so it is perfect to run on Linux and Unix servers alike.
Today we will go over installing Monit to a Debian server. Next, we will make sure that we configure it to email the appropriate administrators for the right services. Then, we will cover how to monitor a service or two. This way you will have a nice start in the world of server monitoring automation. We will even throw in a few tips to make it safe and easier to work with. So if you monitor more than one server, and you need a moment in your life to do something other than admin, you are in the right place. So stick around and let’s get to engineer more time into your day.
Installing Monit
Installation in possible on many Linux servers, though today we will just be working with Debian. The first thing to do is update and upgrade your servers packages.
sudo apt update && sudo apt upgrade -y
Now we can go ahead and install the needed packages.
sudo apt install monit -y

Now we need to enable Monit at boot, so we don’t have to manually start it every time we update or something.
sudo systemctl enable monit

We will also go ahead and start the service now.
sudo systemctl start monit
Now we are going to want to set up some basic configurations located in /etc/monit/monitrc.
sudo vim /etc/monit/monitrc
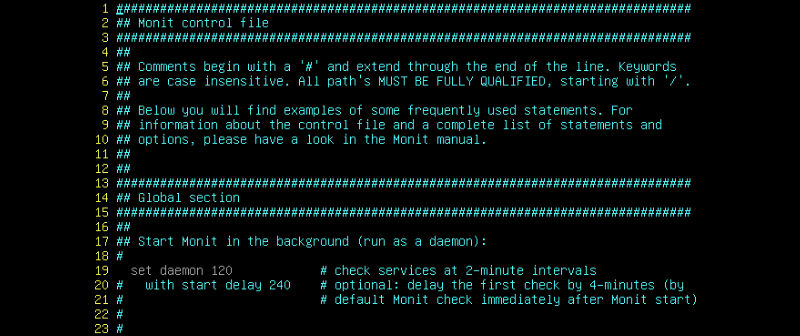
You will notice there are excellent directions in monitrc. You can see that if there is a comment or a #, then you will not be using that section. If there is no comment, then that section is live. Each and every section has a commented header that explain how to use them. It is always good to research them, as to make sure you are using them correctly. For example, the very first global setting is for sample intervals. In other words, how often Monit will check on the systems specified. We can go ahead quit out of this file by typing :q.
Monit Global Settings
The first thing we need to do is copy our current monitrc file. This is so that you can read it for yourself in its entirety. Also, we will be able to restore to this file when or if we need to. Alternatively, every time we make a configuration change we can save the previous version for the same reason.
sudo cp /etc/monit/monitrc /etc/monit/monitrc.copy
You can rename your copy however you need to reflect its version. Now for the next step we are just going to delete the original, then create a new file to add our configurations to.
sudo rm /etc/monit/monitrc && sudo vim /etc/monit/monitrc
To edit, type a. Don’t worry, we are going to set you on your journey right. We will add the following configurations to help make this a little easier. You can type along or copy and paste.
					# Globals #
###########
#
# set daemon interval in seconds
set daemon 60
#
# set monit log
set log /var/log/monit.log
#
# set SMTP email
set mailserver mail.yourmailserver.com port 587
   username "me@yourmailserver.com" password "mypassword" #change for production
   using tlsv1
   with timeout 30 seconds

#set the from email which should be same as the one above
set mail-format { from: me@yourmailserver.com }
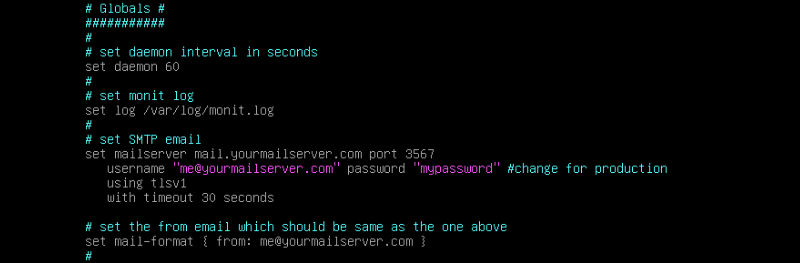
Notice here in our additions we are setting the daemon interval to check our selected services every 60 seconds. Next we are embracing the default log location. But you can go ahead and leave this where you like. Next you really want the alerts, so we will need to add a SMTP configuration to make sure you get your emergency mail, as postfix can trip your spam detection. This is a great way to make sure you are getting alerts in real time on the go.
Monit Services
Now we are getting into services that we might actually want to monitor. Notice we never exited the editor. We still need to add more configurations.
					# Services #
############
#
#  check system
check system $HOST
   if cpu usage > 90% for 10 cycles then alert
   if memory usage > 70% then alert
#
# check disk
check filesystem root with path /dev/sda1
    if space usage > 90% then alert
#
#  check apache
check apache process with pidfile /usr/local/apache/logs/httpd.pid
   if cpu > 60% for 2 cycles then alert
   if cpu > 80% for 5 cycles then restart
#
# custom bash example
#  check program mysript at path /usr/local/bin/myscript.sh
#     if status != 0 then alert
#
# Includes #
############
#
# include additional files or paths
include /etc/monit/conf.d/*
include /etc/monit/conf-enabled/*
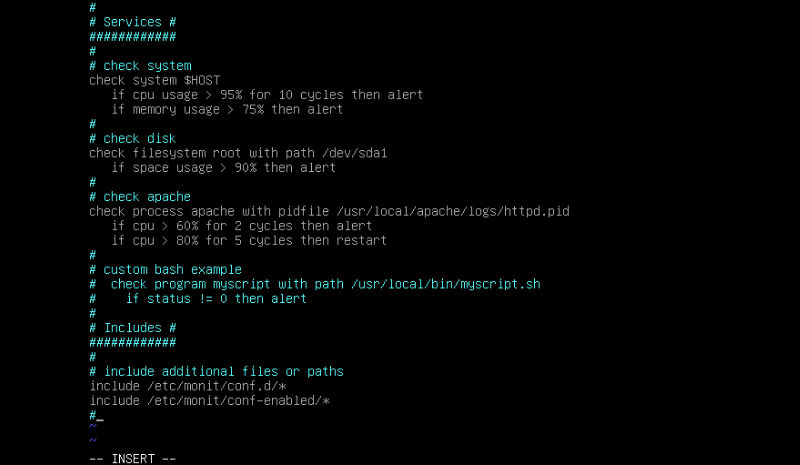
Now this is where we start to get to the monitoring. At the top of the section you can see that we are monitoring some important systems. Both CPU and RAM usage. We are asking for alerts at defined percentages. Next we are checking that our disk space does not exceed 90%. Following this, we decided to configure Apache to be checked by .pid file. Making sure that we don’t exceed defined percentages. Then we have added an example of how to add a custom script. Following this, we added the default includes. Now we can go ahead and hit Esc to stop editing, then type :wq to write and quit the file. Finally, we need to make this file executable for Monit to run. As we generated this file if you remember.
sudo chmod 0700 /etc/monit/monitrc
The next thing we need to do is restart the service. But first we will check out file for mistakes with like this.
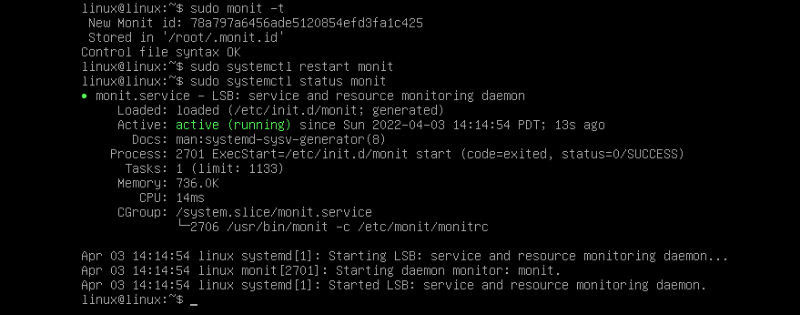
sudo monit -t

If you do not get a pass, then you should not restart the service yet. Keep working with the syntax to make sure there are no mistakes. If all is well like in our case, you can move on.
sudo systemctl restart monit
Finally, we can check the status.
sudo systemctl status monit
Now you should have a pretty good idea how to set up Monit on a Debian server. This will also work on Ubuntu with little to no adjustment. Now you can set up any type of service monitoring you would like. These were only to serve as a blueprint for further monitoring schema. So if you have a Nginx server running, you can monitor that instead. If you wanted to add a custom script that you want to monitor, Monit can handle it with ease. The best part is you can configure it to email you bringing you all the alerts you need, so you don’t have to SSH in to see your readouts. So upgrade your monitoring skills today. Use what the professionals use, perhaps gain the experience and become one. Thanks for reading.