Have you ever had a major file corruption or lost a device? Perhaps you simply like to be thorough when backing up files. Today we bring you rsync. This will not necessarily replace a GUI backup solution like TimeShift can be configured. As a command line application, you will have the satisfaction of managing your files quickly, while only backing up the files that change. You will save time with large file sets, like video or photo libraries. After suffering a file corruption that made my machine unable to boot, while also having to get back from loosing 2fa backup codes. I understand the pain that comes with a complete restoration.
We will go over the breakdown of the commands you will likely need to start your new backups. Next, we will be sure not to use any options that will overwrite our backups. As this can be the case if you back up a directory that is empty, to a backup destination that is not empty. That being said, there are so many advantages to rsync, you can not even count. As a developer, I use GitHub for project backups at times. This option does not replace social coding. But it does mean your backups can be as private as you wish, with no limitations set by Microsoft. So grab a cup of matcha, and let’s get focused on building our Linux Lazarus pit.
INSTALLATION
First, we need to see what version we have while making sure your Linux installation has rsync installed.
rsync -v

rsync  version 3.2.3  protocol version 31
Copyright (C) 1996-2020 by Andrew Tridgell, Wayne Davison, and others.
Web site: https://rsync.samba.org/
Capabilities:
    64-bit files, 64-bit inums, 64-bit timestamps, 64-bit long ints,
    socketpairs, hardlinks, hardlink-specials, symlinks, IPv6, atimes,
    batchfiles, inplace, append, ACLs, xattrs, optional protect-args, iconv,
    symtimes, prealloc, stop-at, no crtimes
Optimizations:
    SIMD, no asm, openssl-crypto
Checksum list:
    xxh128 xxh3 xxh64 (xxhash) md5 md4 none
Compress list:
    zstd lz4 zlibx zlib none

rsync comes with ABSOLUTELY NO WARRANTY.  This is free software, and you
are welcome to redistribute it under certain conditions.  See the GNU
General Public Licence for details.

rsync is a file transfer program capable of efficient remote update
via a fast differencing algorithm.

Usage: rsync [OPTION]... SRC [SRC]... DEST
  or   rsync [OPTION]... SRC [SRC]... [USER@]HOST:DEST
  or   rsync [OPTION]... SRC [SRC]... [USER@]HOST::DEST
  or   rsync [OPTION]... SRC [SRC]... rsync://[USER@]HOST[:PORT]/DEST
  or   rsync [OPTION]... [USER@]HOST:SRC [DEST]
  or   rsync [OPTION]... [USER@]HOST::SRC [DEST]
  or   rsync [OPTION]... rsync://[USER@]HOST[:PORT]/SRC [DEST]
The ':' usages connect via remote shell, while '::' & 'rsync://' usages connect
to an rsync daemon, and require SRC or DEST to start with a module name.

Options
--verbose, -v            increase verbosity
--info=FLAGS             fine-grained informational verbosity
--debug=FLAGS            fine-grained debug verbosity
--stderr=e|a|c           change stderr output mode (default: errors)
--quiet, -q              suppress non-error messages
--no-motd                suppress daemon-mode MOTD
--checksum, -c           skip based on checksum, not mod-time & size
--archive, -a            archive mode; equals -rlptgoD (no -H,-A,-X)
--no-OPTION              turn off an implied OPTION (e.g. --no-D)
--recursive, -r          recurse into directories
--relative, -R           use relative path names
--no-implied-dirs        don't send implied dirs with --relative
--backup, -b             make backups (see --suffix & --backup-dir)
--backup-dir=DIR         make backups into hierarchy based in DIR
--suffix=SUFFIX          backup suffix (default ~ w/o --backup-dir)
--update, -u             skip files that are newer on the receiver
--inplace                update destination files in-place
--append                 append data onto shorter files
--append-verify          --append w/old data in file checksum
--dirs, -d               transfer directories without recursing
--mkpath                 create the destination's path component
--links, -l              copy symlinks as symlinks
--copy-links, -L         transform symlink into referent file/dir
--copy-unsafe-links      only "unsafe" symlinks are transformed
--safe-links             ignore symlinks that point outside the tree
--munge-links            munge symlinks to make them safe & unusable
--copy-dirlinks, -k      transform symlink to dir into referent dir
--keep-dirlinks, -K      treat symlinked dir on receiver as dir
--hard-links, -H         preserve hard links
--perms, -p              preserve permissions
--executability, -E      preserve executability
--chmod=CHMOD            affect file and/or directory permissions
--acls, -A               preserve ACLs (implies --perms)
--xattrs, -X             preserve extended attributes
--owner, -o              preserve owner (super-user only)
--group, -g              preserve group
--devices                preserve device files (super-user only)
--specials               preserve special files
-D                       same as --devices --specials
--times, -t              preserve modification times
--atimes, -U             preserve access (use) times
--open-noatime           avoid changing the atime on opened files
--crtimes, -N            preserve create times (newness)
--omit-dir-times, -O     omit directories from --times
--omit-link-times, -J    omit symlinks from --times
--super                  receiver attempts super-user activities
--fake-super             store/recover privileged attrs using xattrs
--sparse, -S             turn sequences of nulls into sparse blocks
--preallocate            allocate dest files before writing them
--write-devices          write to devices as files (implies --inplace)
--dry-run, -n            perform a trial run with no changes made
--whole-file, -W         copy files whole (w/o delta-xfer algorithm)
--checksum-choice=STR    choose the checksum algorithm (aka --cc)
--one-file-system, -x    don't cross filesystem boundaries
--block-size=SIZE, -B    force a fixed checksum block-size
--rsh=COMMAND, -e        specify the remote shell to use
--rsync-path=PROGRAM     specify the rsync to run on remote machine
--existing               skip creating new files on receiver
--ignore-existing        skip updating files that exist on receiver
--remove-source-files    sender removes synchronized files (non-dir)
--del                    an alias for --delete-during
--delete                 delete extraneous files from dest dirs
--delete-before          receiver deletes before xfer, not during
--delete-during          receiver deletes during the transfer
--delete-delay           find deletions during, delete after
--delete-after           receiver deletes after transfer, not during
--delete-excluded        also delete excluded files from dest dirs
--ignore-missing-args    ignore missing source args without error
--delete-missing-args    delete missing source args from destination
--ignore-errors          delete even if there are I/O errors
--force                  force deletion of dirs even if not empty
--max-delete=NUM         don't delete more than NUM files
--max-size=SIZE          don't transfer any file larger than SIZE
--min-size=SIZE          don't transfer any file smaller than SIZE
--max-alloc=SIZE         change a limit relating to memory alloc
--partial                keep partially transferred files
--partial-dir=DIR        put a partially transferred file into DIR
--delay-updates          put all updated files into place at end
--prune-empty-dirs, -m   prune empty directory chains from file-list
--numeric-ids            don't map uid/gid values by user/group name
--usermap=STRING         custom username mapping
--groupmap=STRING        custom groupname mapping
--chown=USER:GROUP       simple username/groupname mapping
--timeout=SECONDS        set I/O timeout in seconds
--contimeout=SECONDS     set daemon connection timeout in seconds
--ignore-times, -I       don't skip files that match size and time
--size-only              skip files that match in size
--modify-window=NUM, -@  set the accuracy for mod-time comparisons
--temp-dir=DIR, -T       create temporary files in directory DIR
--fuzzy, -y              find similar file for basis if no dest file
--compare-dest=DIR       also compare destination files relative to DIR
--copy-dest=DIR          ... and include copies of unchanged files
--link-dest=DIR          hardlink to files in DIR when unchanged
--compress, -z           compress file data during the transfer
--compress-choice=STR    choose the compression algorithm (aka --zc)
--compress-level=NUM     explicitly set compression level (aka --zl)
--skip-compress=LIST     skip compressing files with suffix in LIST
--cvs-exclude, -C        auto-ignore files in the same way CVS does
--filter=RULE, -f        add a file-filtering RULE
-F                       same as --filter='dir-merge /.rsync-filter'
                         repeated: --filter='- .rsync-filter'
--exclude=PATTERN        exclude files matching PATTERN
--exclude-from=FILE      read exclude patterns from FILE
--include=PATTERN        don't exclude files matching PATTERN
--include-from=FILE      read include patterns from FILE
--files-from=FILE        read list of source-file names from FILE
--from0, -0              all *-from/filter files are delimited by 0s
--protect-args, -s       no space-splitting; wildcard chars only
--copy-as=USER[:GROUP]   specify user & optional group for the copy
--address=ADDRESS        bind address for outgoing socket to daemon
--port=PORT              specify double-colon alternate port number
--sockopts=OPTIONS       specify custom TCP options
--blocking-io            use blocking I/O for the remote shell
--outbuf=N|L|B           set out buffering to None, Line, or Block
--stats                  give some file-transfer stats
--8-bit-output, -8       leave high-bit chars unescaped in output
--human-readable, -h     output numbers in a human-readable format
--progress               show progress during transfer
-P                       same as --partial --progress
--itemize-changes, -i    output a change-summary for all updates
--remote-option=OPT, -M  send OPTION to the remote side only
--out-format=FORMAT      output updates using the specified FORMAT
--log-file=FILE          log what we're doing to the specified FILE
--log-file-format=FMT    log updates using the specified FMT
--password-file=FILE     read daemon-access password from FILE
--early-input=FILE       use FILE for daemon's early exec input
--list-only              list the files instead of copying them
--bwlimit=RATE           limit socket I/O bandwidth
--stop-after=MINS        Stop rsync after MINS minutes have elapsed
--stop-at=y-m-dTh:m      Stop rsync at the specified point in time
--write-batch=FILE       write a batched update to FILE
--only-write-batch=FILE  like --write-batch but w/o updating dest
--read-batch=FILE        read a batched update from FILE
--protocol=NUM           force an older protocol version to be used
--iconv=CONVERT_SPEC     request charset conversion of filenames
--checksum-seed=NUM      set block/file checksum seed (advanced)
--ipv4, -4               prefer IPv4
--ipv6, -6               prefer IPv6
--version, -V            print the version + other info and exit
--help, -h (*)           show this help (* -h is help only on its own)

Use "rsync --daemon --help" to see the daemon-mode command-line options.
Please see the rsync(1) and rsyncd.conf(5) man pages for full documentation.
See https://rsync.samba.org/ for updates, bug reports, and answers
rsync error: syntax or usage error (code 1) at main.c(1801) [Receiver=3.2.3]
Now, that is a huge print-out with tons of gems. We will go over what you need to know to start today, rather than overwhelm you with every single command. If you did not get a huge print-out, you can install rsync for your system. Better yet, you may want to upgrade your version manually. We will show installation options for Debian, openSUSE and RHEL based distributions. We will also throw our macOS cousins a bone.
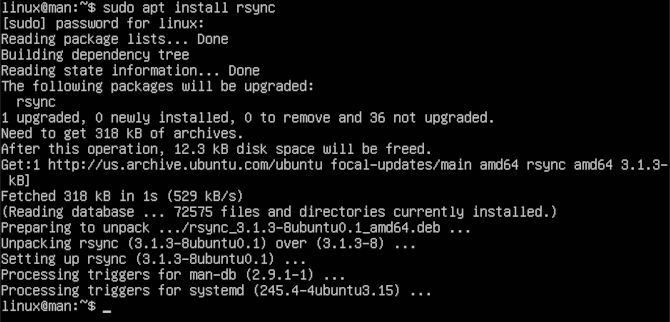
Debian/Ubuntu
sudo apt install rsync
openSUSE
sudo zypper install rsync
RHEL/Fedora
sudo yum install rsync
macOS
sudo brew install rsync
LOCAL BACKUPS
For starters, we will show how to back up a directory on your local machine. We will create a destination called Backups in our home directory. Then we will copy our Documents directory to Backups.
mkdir ~/Backups

rsync -a ~/Documents ~/Backups
Note, this will give you an exact copy, backing up everything for the first time. You can set options to help delete files that you no longer need backed up, that no longer exist in Documents, while backing up changed files.
rsync -a --delete ~/Documents ~/Backups
Remember, if you use the –delete option, you will delete anything in your Backups directory that has been deleted in your Documents directory. This is awesome if you mean to do this. If you delete everything in your Documents folder by mistake, then run this command, you will lose everything in your Backups directory! So use with caution. Now we will go over how to update only files that you have altered.
rsync -au ~/Documents ~/Backups
Notice that the -u or the –update option forces rsync to skip that files in your destination directory that are still new. Now we will show how to restore from your Backups directory back to your Documents directory.
rsync -a ~/Backups ~/Documents
Now that we have demonstrated this, you can clean up the local Backups directory if you wish. That way, your home directory does not have to have a second copy of all your documents.
sudo rm -r ~/Backups
USB BACKUPS
Now, we will set up a more meaningful solution using a USB drive device. After you plug in your device, let’s check to see what our USB is named using lsblk.
lsblk
You get the idea here that lsblk shows lots of information about block devices. In my case, my drive is named sdb1. Now, we will mount the drive.
sudo mount /dev/sdb1 /media
Next, similar to before, we will back up the Documents directory over to the USB device.
sudo rsync -a ~/Documents /media
This can also involve a set of directories on the device. That way, you can back up many devices to the same drive. Let’s make another Backups directory and then back up our Documents directory once again.
					sudo mkdir /media/Backups

sudo rsync -a ~/Documents /media/Backups
Similar to before, we will update only the files that change to save transfer time.
sudo rsync -au ~/Documents /media/Backups
At this point, you should have a partial backup that is not on your device, leaving your Documents directory safe in time of crisis. Why not back up our entire home directory. Make sure your destination USB device has the capacity to hold this directory. You can use the lsblk command to see the size of the drive where your home directory is located.
lsblk
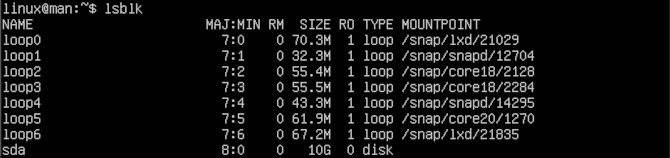
Find your sda drive, then take note of the amount of space it requires. Make sure your destination USB device is larger than your sda drive before following the next step.
sudo rsync -a /home /media/Backups
Congratulations, you can resurrect this user from the ashes after a loss of some important files. You can also restore this user to another machine when changing computers. This will make a complete copy of this directory every time. We will now show you how to omit a directory that may not have any meaning to you.
sudo rsync -a –exclude=~/.cache /home /media/Backups
Now, let’s say you have several directories you do not want to back up, yet still make an effective back-up.
sudo rsync -a –exclude={~/.cache, ~/Downloads} /home /media/Backups
All you need to do is add curly brackets, then space with commas. We are using ~/ to specify a directory in the /home folder itself. Now we can dismount our USB device.
sudo unmount /dev/sdb1
REMOTE BACKUPS
Now that we have a better understanding of rsync, let’s create a new directory call Projects. We will create a test-A.txt file to see if everything worked. Then we will proceed to back up this directory to a remote server.
					mkdir ~/Projects
touch ~/Projects/test-A.txt
sudo rsync -raz --progress ~/Projects linuxman@0.0.0.0:
You can see we used the -r option for recursive, as well as the -z option for compression. We also used the –progress option to see what was going on during the transfer. You can also use the -v option to get a verbose output. You can now see if your remote server in place of linuxman@0.0.0.0: has your test.txt file to confirm the transfer took place. Now we will show you how to update only the files that you have changed to save time like before. First, we will create a new file called test-B.txt. Then we will proceed to update.
touch ~/Projects/test-B.txt

sudo rsync -rauz --progress ~/Projects linuxman@0.0.0.0:
You can see, similar to before, we used -u option to only update newly added or modified files. In addition to the previously used options. You can check your test-A.txt file on your remote backup using stat.
stat test-A.txt
The time index should show your first original rsync backup.
We can now say you are ready to start using rsync to back up all kinds of projects. We will write a more advanced blog to show how to use this wonderful tool to back up your devices to a local SFTP server, making your home office safer than ever. There are so many exciting possibilities with rsync. Unfortunately, we would be writing a book to put them all here. Thanks for reading, and learn something new about Linux every day.