As I mentioned in the last article, Azuri is a discord bot that allows Azuracast’ to be able to play our station inside of a discord server. The Azuri GitHub can be found here. As a forewarning, this is a community maintained project and only has the README for documentation which is very vague. To top it off, due to the very niche nature of this bot you’ll find zero help on the net, and it’s a bit buggy. No need to worry as I’ll be providing all the Docker commands I used to help me troubleshoot my setup so don’t fret if it doesn’t work out completely right the first time, this is a tricky bot to deal with.
Installing Azuri
Azuri runs inside of a docker container just like Azuracast so installing it is a simple operation. First clone down the repo to a suitable location. You can reuse the /var/azuracast directory (which will require sudo) or choose another location.
git clone https://github.com/TwixGamer00/azuri
In this repo you’ll find a few files, the important ones being azuri.sample.env (which we will be copying to azuri.env for production), and the Dockerfile, which we will be editing directly later on. Before we edit these files, we must first get our bot token in order.
Getting a Discord bot token
Let’s take a detour over to the Discord Applications page to get our bot token. Go to the Discord Developer Portal found here, make sure that you are logged into your Discord account.

Next Click on “New Application” which will bring up the following Window where you can name your bot.

Name it whatever you please, you can also change it later on. After this you’ll be redirected to your newly minted bot’s management page.

All of the important stuff on this page is on the left hand side on the menu. Next we must create and configure a bot user. Click on the Bot tab on the left and you’ll be taken to the following screen:

Click “Add bot” and confirm it’s creation in the dialog box that pops up and you’ll have a brand new bot to play with. Provide an avatar for your bot here if you wish.

Before we leave this page we’ll need to generate the bot token by clicking on “Reset Token” which will prompt you for your 2FA code (if you have that enabled) and show you the token only once so make sure you copy it down to a secure location. Your bot token is very important to keep guarded because it is essentially your bot’s password and anyone who has it can make your bot act maliciously. Keep it secret, keep it safe. You can reset this token at any time, (in case) just make sure you also update your azuri.env if you do.
Setting Intents
Scroll down and make sure both “Presence” & “Server” Members Intents are turned on, otherwise your bot will error out and not run.

Inviting the Bot
Now that the bot has been created we have to invite it to a server. This part of the process is a bit confusing at first, but by the 2nd or 3rd bot you create it becomes easier.
Setting up In-app Authorization (optional)
This part is optional and is only if you want your bot to be able to be added to other servers. FYI if your bot gets added to 100 or more servers you’ll need to be verified and approved by Discord.
Setting up in-app authorization will add a “Add to Server” button to your bot’s profile which will allow anyone to add it to their server, it will also notify any potential users of what permissions it needs based on what you set to it in the section below.
Setting Bot Permissions
Click on the drop-down link and select “In-app Authorization” . you’ll need to check off the boxes that our Azuri Boot will need, which you can see in the screenshot below, or alternatively in this list:
- Send Messages
- Embed Links
- Connect
- Speak
- Use Voice Activity.


For full functionality you’ll want to give Azuri permission to Send Messages (so it can send you the help message), Embed links (so you can see the Now Playing, Stats, and other options), and Connect, Speak, and use Voice Activity so that you can hear the bot in the voice channel.
Generating an Invite URL
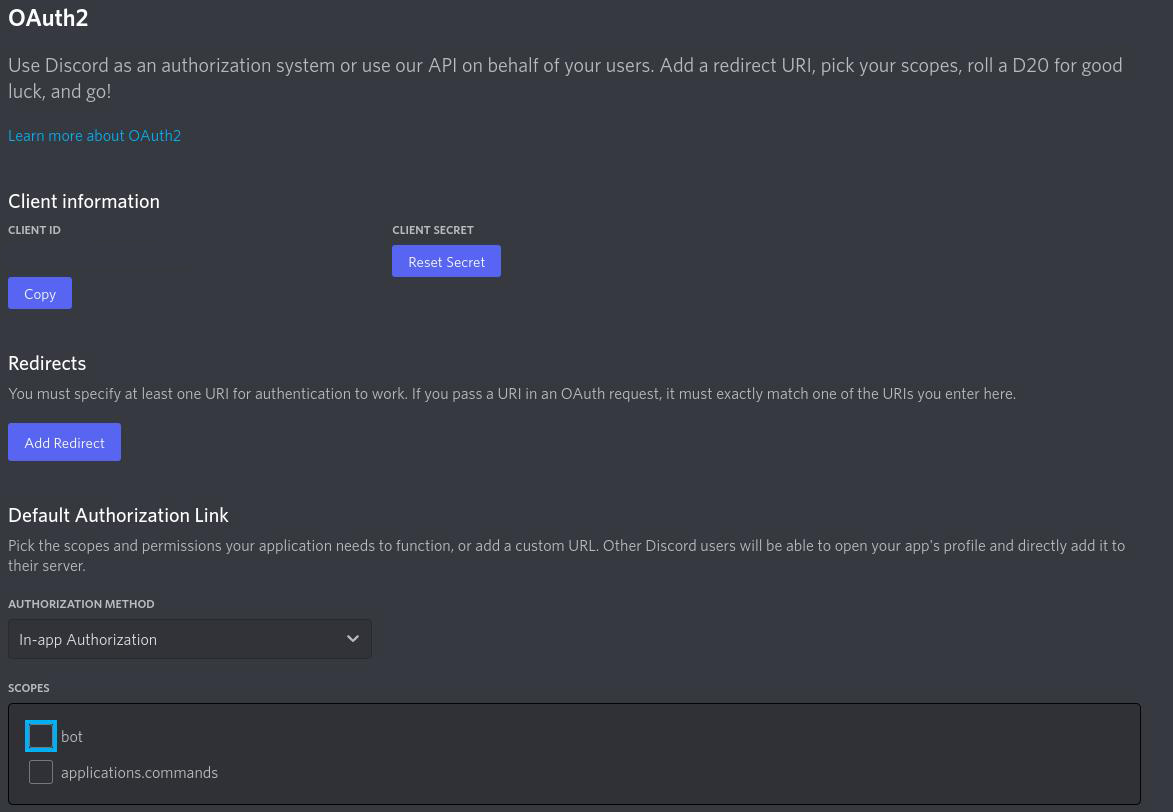
This part is not optional and is required to get your bot into a server, this can be done by going to the “OAuth2” tab, then in the drop down menu selecting “URL Generator”.

If you followed the first section above, you’ll do the same here and check the “bot” scope which will bring up the permissions section where you can check if the same necessary permissions. The invite link will be generated at the bottom of the page and from here all you’ll need to do is copy and paste this link into your browser where you will be prompted to choose a server to invite your bot to.
Azuri Setup
Once you have your bot invited to a server, it will show up on the right, with the rest of your users but will appear offline until the Azuri container is started.

Now for the fun part of this whole thing, editing the files! Navigate back to the Azuri repo you cloned down and make a copy of azuri.sample.env:
cp azuri.sample.env azuri.env
Then using the editor of your choice open azuri.env and add your bot token to the BOT_TOKEN= entry.

The other options here are self-explanatory, and aid with personalizing the bot, like changing its status message and allowing users to kick the bot out with the leave command. There is also an option for an external log path, which will output the docker STOUT (terminal output) of the container into a file. One option here worth noting is DEFAULT_PREFIX= which is the prefix you add to the beginning of the chat commands to operate the Azuri bot. By default it uses tilde (~) but you can modify it here (which helps if you are going to host multiple Azuri bots on the same server) or via the chat commands in Discord.
Editing the Dockerfile
As I said in the opener, Azuri Is community driven, and they can’t catch everything, so bugs exist. I don’t know if its just my set up but I found that the provided Dockerfile will crash after about 30 seconds. After lots of experimenting and using the alternative installation instructions that required direct installation of nodejs and npm (which works, but requires you to either tmux or screen the command that starts Azuri), I’ve come to a potential fix. Simply update the Dockerfile with a different node version! Using a text editor again, change the 1st line from node:16-buster to node:lts-bullseye.
					#Dockerfile
FROM node:16-buster -> FROM node:lts-bullseye
After updating that line when you run docker-compose in the Azuri directory, docker will pull the required containers and actually start the container properly.
docker-compose up -d
Using the same docker ps command from the first part, we can confirm that Azuri is up and running.
sudo docker ps --format "table {{.ID}}\\t{{.Names}}\\t{{.RunningFor}}\\t{{.Status}}\\t{{.Size}}\\t{{.Image}}\\t{{.CreatedAt}}"
Its important to note that you only need to host one instance of the bot as it holds a per server configuration, that is, if you invite your Azuri bot to one server then invite it to another server, you server settings are independent and won’t be overwritten. You can also host multiple bots on one server provided that you create a token per bot and configure separate azuri docker containers.
Editing docker-compose.yml
One more change you’ll want to make is add a restart option to the docker-compose file so that your Azuri container will restart if it goes down or so that it starts at boot with your Azuracast container. Open the docker-compose.yml file located in your Azuri build directory and add the line restart:unless-stopped under the volumes section or copy and paste the following into your docker-compose file.
					version: '2.2'

services:
  azuri:
    image: azuri:latest
    build:
      context: .
    env_file: azuri.env
    volumes:
     - ./src:/data
     - azuri_persist:/data/persist
     - azuri_node_modules:/data/node_modules
    restart: unless-stopped
volumes:
  azuri_persist: {}
  azuri_node_modules: {}
Discord setup
Once the Azuri Container is up and running, your bot will appear as online and be ready to setup in Discord.

To communicate with your bot, you’ll need at least one text channel and one voice channel obviously. and also make sure that in your Server Settings→Roles→@Everyone you have Application Commands enabled and set for your role or everyone depending on the permissions you want to set for your bot.

By default this should be enabled, but double-check on more restricted server or with your server admin if you encounter permission issues with the bot. To configure Azuri all you need to do is enter ~settings into a text channel, which will bring up the settings windows where we can begin setting up Azuri with Azuracast.
Settings Summary
Below you’ll find a table that goes over the important settings.
| Chat Command | Result |
|---|---|
~settings home |
Sets the default channel that Azuri will join when called or when it comes online. |
~settings url |
Sets the radio url from the Azuracast stream |
~settings api |
Will show you now playing and other stats from Azuracast. |
~settings timezone |
Sets the timezone |
~settings permission |
Set permissions bound to commands. Honestly I didn’t use this, so your YMMV. |
-settings prefix |
Change the default prefix from tilde (~) |
-settings locale |
Sets the bot locale (language) |
Out of this set, the most important settings are setting the url, api, and prefix. But you’ll need to head back to the Azuracast web panel to get the required URLS. Head to your station’s management screen and grab the local stream URL and feed that to your bot in this format:
~settings url http://192.168.XX.XX:8000/radio.mp3
On success you’’ll get a confirmation from the bot inside the discord chat window. You can also use a shorthand for settings like so:
~s prefix @
Setting the Base URL, API, and prefix
The next URL that you’ll need to pull will not be immediately evident and requires you to visit a specific URL in this format:
https://yourazuradomain.com/api/nowplaying_static/STATIONNAME.json
This is Azuracast’s API URL. If you’re having trouble finding your station name, check out your station’s public page URL that tell’s you the station name at the end of the URL.
http://192.168.XX.XX/public/test
Once you have the URL, format it like so and set it inside of the Discord chat window.
~settings api http://192.168.1.138/api/nowplaying_static/test.json
Let me say that this particular setting is incredibly finicky and I had submit this setting to Azuri multiple times before it worked. I used local and external IPs with no real rhyme or reason as to which one it preferred as it would accept one or none, and then suddenly accept one and vice versa. I found that it usually works better with a fully qualified domain name but if you run your station locally it works fine too with just a bit more persistence. If you have trouble during this step My advice is to look at the Docker logs as they will tell you if your URL is timing out or just not being accepted for whatever reason. Having some NodeJs familiarity will make these logs easier to read.
docker logs <container-id>
Remember to use docker ps to get your Azuri container id. Finally, the last setting you’ll want to mess with is the default prefix which as I explained earlier is useful if you will be hosting multiple bots on one server or want to add that extra personal touch. I found that special characters and symbols work best.
Using Azuri
With all the hard stuff out of the way, pat yourself on the back because its all easy street from here. All that is left is to actually use our bot to play some jams in a voice channel. Below you’ll find a summary of the Usage commands that will get Azuri to do its thang.
| Chat Command | Result |
|---|---|
join j play start |
Join current voice channel and start radio. |
help h |
Sends you a DM with the contents of this table. |
leave l exit stop quit |
Leave current channel. |
playing np nowplaying current song |
Display now playing information. |
ping |
Get the bots latency. Useful if you are getting interrupts during playback. |
recent history his songs |
Recently played songs. |
settings setting config s |
Change bot settings |
stats stat info botinfo bi |
Stats about the bot. |
support ticket invite vote |
Brings up the support window that shows support links. |
tuned listeners listenercount stationinfo |
View current listener numbers. |
Remember to prefix these commands with tilde (
~).
Finale (reprise)

That’s the end folks! Thanks for reading and sticking through to the end. Personally I learned a ton about docker just getting this bot up and running for my own personal usage. My group of friends like to show each other songs or sync up our listening experiences when we game (you know for atmosphere) but when you don’t all have Spotify, there isn’t that many options available to listen together if you don’t want to add yet another SaSS product to your list of wallet leeches. Thanks to the devs of Azuracast and Azuri for saving us all a big buck!