The great thing about Arch Linux is that you may customize everything, making your system as heavy or lightweight as you wish. This can also be a pain point for maintenance. Some things require more attention than others. So SystemD timers are a great choice to execute the scripts we will end up writing to do these tasks. We might want to update as well along with a few other tasks, like different kinds of cache removal or perhaps even keeping a package list available to back up. SystemD can be a bit controversial, but that is what distributions like Artix are for, offering you the chance to use like 5 or 6 different replacements. However, SystemD is used in most Linux distributions. Making it possible to use these timers on numerous other distributions as long as you adjust for distributions-specific commands. In fact, SystemD timers are more user-friendly than something like a crontab. No need to connect the dots for time fields. Just plain numbers and readable code.
Today we are going to explain how to set up a timer to purge orphaned unwanted packages. Next we will set up a timer to take care of package cache, to free up precious root system space. Next we will then learn to purge RAM cache to keep your system running smoothly even when running more than one VM. Then we will set a timer to keep track of the packages we are using to help backup our configuration. Finally, we will set up a timer to purge orphaned packages, so if you test numerous programs, then you can get rid of their dependencies this way. Now let’s boost your efficiency game and automate the mundane. For when you are done with this blog, you should have a good working knowledge of SystemD timers.
Purge Orphans
Often as a technology-driven individual you might end up installing many packages to test them out. More time than not you will end up needing dependency packages along the way. These are packages that the named installation package depends on to run. We have all approved one or two here and there. In Arch there is not exactly a purge command, but we can establish a script that will first pop a terminal to ask if we want to purge the orphaned packages in question. Then you will be directed to another script that will actually purge the unused packages. The only reason you want this choice is if you do not want to purge the package. Let’s start writing these scripts.
vim ~/.bash/bin/purge-orphans.sh
Type a to edit.
					#!/bin/sh

sudo pacman -Qdtq | sudo pacman -Rs -
Now we can hit Esc to stop editing, then type :wq to write and quit the file. In this script, we are calling up the orphaned packages to be deleted. Next we need to make the scripts executable.
sudo chmod +x ~/.bash/bin/purge-orphans.sh
Now we can proceed to write the service that will trigger the script we wrote.
sudo vim /etc/systemd/system/purge-orphans.service
Then, we can add the needed configurations. Type a to edit.
					[Unit]
Description="A script to purge orphaned packages"

[Service]
ExecStart=/home/user/.bash/bin/purge-orphans.sh
We can hit Esc to stop editing, then type :wq to write and quit the file. Next we are off to write the timer.
sudo vim /etc/systemd/system/purge-orphans.timer
Then, we can add the needed configurations. Type a to edit.
					[Unit]
Description="Purges packages that are orphaned"

[Timer]
OnCalendar=*-*-05 4:00:00
Persistent=true
Unit=purge-orphans.service

[Install]
WantedBy=multi-user.target
Now we can hit Esc to stop editing, then type :wq to write and quit the file. Here we have a timer that is set to persistently run the 5th of every month at 4AM. Now we need to enable and start both service and timer.
sudo systemctl enable purge-orphans.service && sudo systemctl start purge-orphans.service && sudo systemctl enable purge-orphans.timer && sudo systemctl start purge-orphans.timer && systemctl status purge-orphans.timer

You should see a green light on the timer, giving the confidence that your system will be free of orphaned packages.
Root Cache
Now that we have one timer going we can add another to help keep our root partition clear of useless data. We will need to follow the same process as before, but we will only set this to run once a week. Since we are only updating this much, we should only have that much package cache to purge.
vim ~/.bash/bin/pac-cache-purge.sh
We will always name our scripts as practical as possible, so we don’t need to hunt and open each one to find what they do. Type a to edit.
					#!/bin/sh

sudo pacman -Scc --noconfirm && yay -Scc --noconfirm
Now we can hit Esc to stop editing, then type :wq to write and quit the file. Next we need to make the script executable.
sudo chmod +x ~/.bash/bin/pac-cache-purge.sh
Here we are doing something similar to the update script, yet the switches are set to -Scc. This purges the packages cache, which in turn frees up space in your root partition. We also added Yay as not to forget to purge that cache as well. Now we can proceed to write the service.
sudo vim /etc/systemd/system/pac-cache-purge.service
Now we can add the needed configurations to link the script to the service. Type a to edit.
					[Unit]
Description="A script to purge package cache"

[Service]
ExecStart=/home/user/.bash/bin/pac-cache-purge.sh
Now we can hit Esc to stop editing, then type :wq to write and quit the file and we are free to write the timer.
sudo vim /etc/systemd/system/pac-cache-purge.timer
Now we can add the needed configurations. Type a to edit.
					[Unit]
Description="A timer to purge package cache"

[Timer]
OnCalendar=weekly
AccuracySec=1h
Persistent=true
RandomizedDelaySec=6000
Unit=pac-cache-purge.service

[Install]
WantedBy=multi-user.target
Now we can hit Esc to stop editing, then type :wq to write and quit the file. In this timer, we are doing exactly the same as we did in the last section. We are setting our package cache to purge every week to help free up root space. Now we need to enable and start this service. We will also check the status to make sure it is up and ready to go.
sudo systemctl enable pac-cache-purge.service && sudo systemctl start pac-cache-purge.service && sudo systemctl enable pac-cache-purge.timer && sudo systemctl start pac-cache-purge.timer && systemctl status pac-cache-purge.timer

You should see a green light on the timer, giving the confidence that your system will be free of package cache.
RAM Cache
Now if you run virtual machines, and you only have so much RAM to go around – This section is for you! Running a virtual machine with 8 to 16 GB of RAM can leave your host system running slow. We can fix that without any issues using a simple service and timer that will run every 60 minutes. That way we will be able to use a VM without any issues for hours. The script we are going to write here only purges the cached RAM, so it will not disrupt running processes.
vim ~/.bash/bin/ram-cache-purge.sh
Now we can add the script to do our work for us. Type a to edit.
					#!/bin/sh

sudo sh -c "echo 3 | sudo tee /proc/sys/vm/drop_caches"
Once that is finished, hit Esc to stop editing, then type :wq to write and quit the file. Next we need to make the script executable.
sudo chmod +x ~/.bash/bin/ram-cache-purge.sh
Here we are dropping cached RAM using the system script /proc/sys/vm/drop_caches. You guessed it… we will proceed to write the service!
sudo vim /etc/systemd/system/ram-cache-purge.service
Let’s add the needed configurations to link the script to the service. Type a to edit.
					[Unit]
Description="A script to kill cache to free RAM"

[Service]
ExecStart=/home/user/.bash/bin/ram-cache-purge.sh
Then, we can hit Esc to stop editing, then type :wq to write and quit the file. Next we are off to write the timer.
sudo vim /etc/systemd/system/ram-cache-purge.timer
Now we can add the needed configurations. Type a to edit.
					[Unit]
Description="Kills Cache to free RAM"

[Timer]
OnCalendar=hourly
Persistent=true
Unit=ram-cache-purge.service

[Install]
WantedBy=multi-user.target
Now we can hit Esc to stop editing, then type :wq to write and quit the file. Here we are using the OnCalendar section to reflect that we would like to use this script hourly. Making our host system faster and more freed up to do things we would rather it be doing. Last but not least we still need to enable and start this timer.
sudo systemctl enable ram-cache-purge.service && sudo systemctl start ram-cache-purge.service && sudo systemctl enable ram-cache-purge.timer && sudo systemctl start ram-cache-purge.timer && systemctl status ram-cache-purge.timer
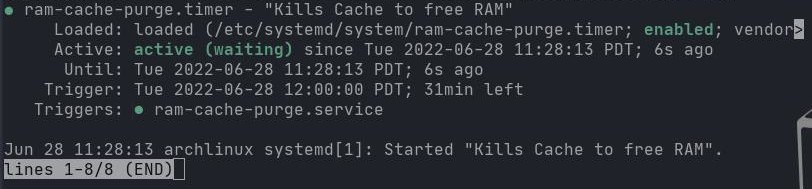
Notice here we also started the service. This is because we want this service and script to start right away without needing to reboot the system, as it is something you may want to take effect immediately.
Backup
Now we have one more service and timer to set. We want to know what packages we are using so that at a later date we can install them again. To make this run every month we will need to adjust the timer section to reflect our wishes. Let’s start with the script as usual.
vim ~/.bash/bin/package-list.sh
Now we can add the script to do our work for us. Type a to edit.
					#!/bin/sh

pacman -Qe | awk "{print $1}" > .pacman_packages
Now we can hit Esc to stop editing, then type :wq to write and quit the file. Next we need to make the script executable.
sudo chmod +x ~/.bash/bin/package-list.sh
Here we are printing the packages that were installed by the user with only package names and versions visible. This will be printed into a dot file called .pacman_packages. Now we can write the service to call our script.
sudo vim /etc/systemd/system/package-list.service
Now we can add the needed configurations to link the script to the service. Type a to edit.
					[Unit]
Description="A script to save a package list"

[Service]
ExecStart=/home/user/.bash/bin/package-list.sh
Now we can hit Esc to stop editing, then type :wq to write and quit the file. Next we write the timer.
sudo vim /etc/systemd/system/package-list.timer
Now we can add the needed configurations. Type a to edit.
					[Unit]
Description="Saves a list of packages installed to the system"

[Timer]
OnCalendar=*-*-01 12:00:00
Persistent=true
Unit=package-list.service

[Install]
WantedBy=multi-user.target
Now we can hit Esc to stop editing, then type :wq to write and quit the file. Here you can see we used a bit of a time code. We are asking SystemD to run our service at 12pm on the first of every month. We simply do not need it to happen any faster unless you go through packages like crazy, and you want a list of them more often. For that, you can just set it to weekly or something else. Now we will enable and start our timer to run.
sudo systemctl enable package-list.service && sudo systemctl start package-list.service && sudo systemctl enable package-list.timer && sudo systemctl start package-list.timer && systemctl status package-list.timer

We should have a green light on the timer. Making sure your system packages are backed up for later export.
Troubleshooter
If you get into trouble or find that your statuses are not coming out as expected, don’t worry! We can always go back and check our scripts first for functionality. All you need to do is run it in terminal as such.
sh ~/.bash/bin/update.sh
If the script updates the packages as you wish, then we can move on. If not, we will work on the script until it runs right. That can take some time if you have a typo or are doing something wrong. Perhaps you are running the script in a Fish-based shell. That will not work as these scripts are POSIX-compliant whereas Fish is not. So, you would need to edit the first line of the script files accordingly. We would also look at the service. We would want to check for typos, and then we can see if it is active.
systemctl is-active package-list.service
You should get a readout of active or inactive from this command. You can adjust your configuration and start over again to see what is going on. Furthermore, you will need to run the following after any edits to a service.
sudo systemctl daemon-reload
Now we can do something similar with the timers. We will want to run the same commands to see if they are active just like this.
systemctl is-active ram-cache-purge.timer
Now you can also run this to check any service or timer in more detail as we showed previously.
systemctl status pac-cache-purge.timer
You can see you get a very detailed status with green or red lights confirming the status is active or not. We hope you enjoy automating your system maintenance. You now have the power to run your system how you like!