Here’s one for the Arch\Arch-based gang! Today I’ll be covering basic pacman commands that you need to know in order to really use pacman to its fullest potential. I’ll also be covering some more exotic/situational commands that are just helpful to know up to the plain ol’ dangerous to your system ones. Now let’s delve deep because this is a long one.
Aliasing a Command
A quick note before we jump in: pacman requires root access for most of its commands. I recommend creating an alias for pacman in your shell config file, eg, .bashrc or .zshrc. This way all you’ll need to type out is pacman instead of sudo pacman every time.
					# Add to the alias section or end of file
# typically ~/.bashrc or ~/.zshrc

alias pacman="sudo pacman"
You can do this with pretty much any command and on any Linux distro so go nuts! On any system I use regularly, I’ll often create an update alias for updating the system without having to type out the standard fare.
					# Add to the alias section or end of file
alias update="sudo pacman -Syu"
I’ll be prefacing the commands with sudo anyway for ease of use.
General
pacman uses a few main ‘transactions’, the ones that we will primarily be using are: sync (-S), query (-Q), and remove (-R). All of the commands I’ll be showing you will involve at least one of them along with a few added switches to tweak their behavior. The switches share the same symbols but when combined with a parent transaction the context of it what it does changes. For example the n in -Qn is different from the n in -Rn. It will make sense once you start using the commands.
Updating and Upgrading
On any Linux system connected to the internet, you’ll want to have the most up-to-date packages and system. This can be done in 1 command with pacman:
sudo pacman -Syu
This command tells pacman to sync the local database against the remote master server (-S), update the local cache (y) and upgrade the packages (u). You may also just specify just -Su which will upgrade all out-of-date packages, skipping updating your cache, but who wants old cache?
Installing packages
Now let’s install something! As you saw above, pacman uses option switches to modify its behavior. Using the -S option, along with the name of the package we want to install, is all this command needs. Like apt on Debian systems, pacman will also install the needed dependencies the packages needs to run. pacman will also list some optional dependencies that provide additional support/features.
sudo pacman -S package
You can also chain the names of packages you want to install to get them all in one go.
sudo pacman -S package1 package2 package3 package4
Installing a group of packages
You may also install an entire group of packages this way.
sudo pacman -S group
For example if you were installing a desktop environment like gnome or xfce4 you’ll be shown a terminal UI that displays all the packages in that group along with an selection input where you may pick and choose which packages you want, separated by spaces.
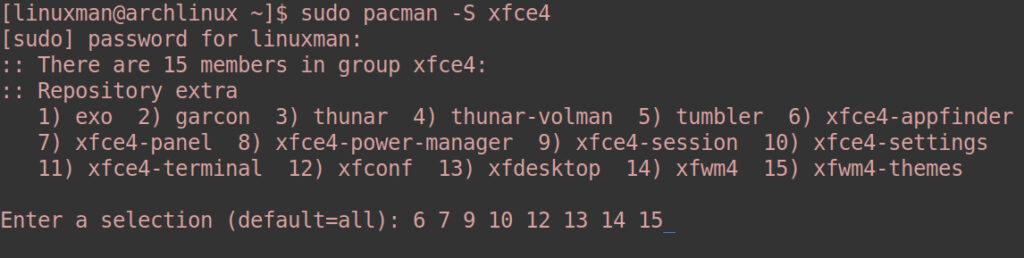
Note: that a default of ‘all’ is not always the right choice, as packages even within the same group can conflict with each other.
pacman will let you know during installation if one package conflicts with another and will remove one of the offending packages automatically. This is likely not what you want so some manual intervention will need to be applied through the selection menu.
Situational install options
Here is a quick summary of other install commands that may prove useful in one way or another.
| Option | Result |
|---|---|
-d, –nodeps |
By default pacman checks if a package’s dependencies are met before it installs the package. This skips the version check, but allows the name check, specify -dd to skip all dependency checks. |
–assume-installed |
Add a dummy package “package” with version “version” to satisfy dependencies. This allows you to disable a specific dependency check without completely disabling all of them like the above option. |
–ignore |
Tells pacman to ignore upgrades for provided packages. Multiple packages can be specified by separating them by a comma. |
-p, –print |
prints the target without performing any actual changes to the system. By default this will just show you where the file is located on your system. Use the below command to really get use out of this. |
–print-format “%n %v %l %r %s” |
takes the above further by giving you a configurable info readout. The attributes you can pass in the parentheses is: “%n” for pkgname, “%v” for version, “%l” for location, “%r” for repository, and “%s” for size. |
–noconfirm |
Bypass all “Are you sure?” messages. Recommend for scripting purposes. |
–noprogressbar |
Hides the progress bar when downloading files. Again, useful for scripting purposes. |
-v, –verbose |
Output paths and lots of other info to the terminal. |
Removing Packages
You can remove a package in a couple of ways. The command above will simply remove a package along with its files (-R).
					# remove single
sudo pacman -R package

# remove multiple
sudo pacman -R package1 package2 package3
You can also uninstall multiple packages at the same time by separating them with a space.
Removing with dependencies
If you want to also remove the package along with its dependencies use the -Rs option. The same command will let also you remove an entire group of packages by specifying the group package name.
					sudo pacman -Rs package

# following the earlier example #
sudo pacman -Rs xfce4 sudo pacman -Ru package
-Rs removes the package and installed dependencies recursively (s). Be very careful with this command because careless usage might remove something important and you’ll break your system.
Removing Orphan packages
Invariably you’ll end up with some stray packages here and there, it happens. Colloquially these packages are called orphans (packages installed as a dependency but are no longer required by any package). To purge packages marked as dependencies enter one of the following commands:
					sudo pacman -Qtdq | sudo pacman -Rns -
# or
sudo pacman -Rns $(pacman -Qtdq)
pacman -Qtdqqueries (-Q) the database for unrequired packagestand when combined withd, it will filter out orphans andqkeeps the terminal output to a minimum.pacman -Rnsremoves packages (-R) recursively (s), and ignores file backup destinations (n). Thenis provided because normallypacmanwill check the database to see if a file should be preserved and renamed with a.pacsavefile extension instead of removing it.
Both versions of this command are doing the same thing just formatted slightly different. The first command pipes | the output of -Qtdq to an argument - that is fed into the -Rns command. The 2nd command is running $(pacman -Qtdq) in a sub shell (indicated by $() returning its output as a value that is then passed to the main -Rns command.
If you get the following message then that just means you don’t have any orphans 🙂
error: no targets specified (use -h for help)
Utility
These next set of commands will get you familiar with pacman’s other commands.
Clearing Cache
When pacman downloads packages, it saves them to a cache directory. Databases are also saved every time you run a sync and they are kept by pacman. To free up disk space you can remove these downloaded packages and unused sync databases by passing the c switch to the sync transaction -S once. Pass c twice to also remove the files from the cache. Regardless you’ll be asked to confirm before emptying out each directory.
					sudo pacman -Scc
# to skip confirmation prompts
sudo pacman -Scc --noconfirm
One trick here would be to combine this command with the —noconfirm option to skip the confirmation checks.
Listing packages with queries
One of pacman’s coolest features is being able to very effectively filter and list your currently installed packages. A practical example of this would be this: Say for posterity’s sake you wanted to keep a list of packages you currently have installed because you got a good base system going on. We could run pacman with just -Q but that would return a very long list of every package the system has installed. Instead use -Qe to filter out the results to just packages that were explicitly installed, IE directly through the terminal or some script.
sudo pacman -Qe
This will return a much shorter list, (that is, if you don’t have a butt-load of stuff installed, but YMMV). If you wanted to save this list to text file all you need to do is direct the output of this command to a text file like so:
sudo pacman -Qe >> explicitly-installed-packages.txt
You’ll have a long text file that you can parse however you please. There are many ways you can filter out this list, I’ll go through a few more examples of this using -Q and its options.
Intel gathering
While looking at lists of packages is fine, unless you are a giant linux nerd already and know everything, you’ll quickly find that the name of the package alone will tell you very little about what it does. Using i (info) amends that! On its own pacman -Qi will spill the beans on every package currently installed on the system.
sudo pacman -Qi
The information output will tell you the name, version, author, description, file size, install reason, dependencies and much more. An example of an advanced usage of this command is combing it with a text data manipulator awk to parse the text output of -Qi using regex to filter out just the install size but this can be done with any of the properties spit out by -Qi.
LC_ALL=C pacman -Qi | awk '/^Name/{name=$3} /^Installed Size/{print $4$5, name}' | sort -h
If you pass a package name along with it then you’ll just get the info on that package alone.
To make the output more palatable I would direct the output to something like more, less, pager, or fzf for an easier time looking through the info.
sudo pacman -Qi package

Another helpful option to use with query is l, which will list all the files owned by the package along with file paths of those files. Really useful if you are looking for a config file or want to clean up any loose files manually.
sudo pacman -Ql package
Like I mentioned earlier using a pager program makes it easier to look through the list but the best way of doing this I found comes from the Arch wiki (like always) which passes the output of the query to fzf which presents you a tmux/screen two pane environment where you can use your arrow keys to make your way through the list on the left, while all the package information is displayed on the right, exit via Ctrl+D.

Here’s the necessary commands to install fzf, and run the pacman query.
					sudo pacman -S fzf
pacman -Qq | fzf --preview 'pacman -Qil {}' --layout=reverse --bind 'enter:execute(pacman -Qil {} | less)'
Other Listing commands
These next few commands filter the packages that show up in your list to varying degrees.
| Option | Result |
|---|---|
pacman -Qm |
List all foreign packages (think manually downloaded\installed like from a git repo) |
pacman -Qn |
List all native (installed via sync -S) packages |
pacman -Qent |
List all explicitly installed native packages that are not direct/optional dependencies |
pacman -Sg group |
List all packages in the named group |
pacman -Qs |
Searches locally installed packages for provided regex pattern (entering the package name is enough) and returns all matching packages. |
Conclusion
I would consider most of these commands to be pretty practical in terms of their utility, they are by no means the only ones. There are a lot more interesting ones that I recommend checking out on the Arch Wiki linked here. As always I also recommend checking out the man pages for the full nitty-gritty. Not the most exciting read out there but reading the manual is what separates us from the animals. Thanks for reading and hopefully you’ve walked away with more knowledge of both pacman and the packages you have installed on your system.