If you have ever installed Arch before, (especially if you are new) then you know how complex it can be. No doubt if you are here then you may have forgotten to install something the first time through. Rendering your fresh installation useless in a non-boot-able state. If you are lucky then its in a less than functional state but it can still get recovered. We will show you how to get back into your system right at the arch-chroot stage of the installation. So we can fix these errors. Arch can be challenging when you are new. So, why punish yourself by having to reinstall it after messing up? Or getting stuck in a loop that leaves you distribution hopping because you are too scared of Arch.
Today we will cover likely issues that may occur and show how arch-chroot can fix them. Up next will cover procuring and writing to media. Just in case you no longer have your Arch installation media. Next, we will go over booting from said media. The next thing we do is mount the partitions to prepare for arch-chroot. Then, we will arch-chroot into the user we are wishing to fix. Finally, we will go over some possible fixes to common mistakes. Now let’s learn how to make a broken system usable again.
Common Issues
So, why would you want to go back to the installation process for installing Arch? We will give you three examples today and by the end offer some fixes. Common issues include:
- Forgotten Grub installation or configuration.
- Broken log in.
- Failed Kernel replacement.
If you have been using Arch long, then you may have already experienced some of these issues. Due to all the steps its easy to forget to install a boot-loader during installation. Or say you wanted to try a console log in solution? What if you tried changing DMs (Display Manager)? Or decided to run the LTS kernel over the regular rolling release kernel? Whatever got you into your current Arch woes there is no need to reinstall Arch all over again. If you fail at any of these procedures know that they are fixable. Many of these things are solvable by arch-chroot.
If these problems seem too much, its okay to try something else too. Don’t feel pressured into jumping into vanilla Arch. You should try non-vanilla Arch derivatives out there. Provided you know the differences in said derivative. We have several articles that cover such distributions like Xero, Manjaro, Endeavour, and Garuda.
DD
To get started we will go over how to image a USB for Arch installation media. First we need to navigate to the Arch download page found here. We will then have to make a choice, torrent or ISO direct download. We have covered torrents before, so we will go ahead and do a direct download using wget. Make sure to choose the mirror nearest to you. We will be using one in the United States, in the state of Arizona to be exact.
cd ~/Downloads && wget https://mirror.arizona.edu/archlinux/iso/2022.06.01/archlinux-2022.06.01-x86_64.iso
Now that we have our image we need to image it to a USB. First we have to take some precautions as to not lose any precious data. Plug in the USB.
lsblk
This command should tell us what block devices are presently connected. Now we can deduce the correct drive to choose for imaging the Arch installation media. This is important as you do not want to overwrite anything important. It would suck to lose a gaming drive or something like that. The dd command will obliterate all the data on the drive selected. Now let’s image the USB.
sudo dd if=archlinux-2022.06.01-x86_64.iso of=/dev/sdb bs=64K conv=noerror,sync status=progress
We will need to be root to use this command. We are using dd to copy if=archlinux-2022.06.01-x86_64.iso over to of=/dev/sdb. We can do this because we are in the ~/Downloads directory, so we do not need to write the full path from root. Next specify the bit size with bs=64K. Make the bit size 64K. We could do something like 8M if we would like. They use 64K on the Arch wiki, so we will stick to that. Following that we ask for a conversion sync with conv=noerror,sync. Finally, we are asking for the progress with status=progress. Making it more obvious when the imaging gets completed.
Media Boot
Every system is different. My computer may have different boot keys than yours. There are so many brands with their own defaults so find out yours. Search for your boot keys on Google or DuckDuckGo. It is up to you what search engine you like. We will first need to consider our computer brand and model number. If you have a laptop that may be on top. Or find somewhere you can see it if you don’t have stickers covering it. Otherwise, it will likely be on the bottom of your laptop. For a PC tower or all-in-one it should be located on the backside. We will need to search using terms like this for example:
Lenovo Thinkpad X260 Boot Key
Choose whatever is first in your search results. The model number is what will get you the boot key or combination. Now that we (hopefully) know what model are system is lets go through the process. For me I have to hit Enter on boot giving me a boot options menu. From there I hit F12 to see my boot options menu. Furthermore, you will see all the possible options to boot from. At this point, you must boot into the appropriate installation mode for your system. Legacy or more commonly UEFI. Proceed to boot into the installation media as if you were going to install Arch Linux for the first time.
Arch-Chroot
Now that we booted into our installation media we can start a modified arch-chroot. We will be skipping a few steps to get to where we need. We will need to mount the partitions to gain arch-chroot. First we will mount the root partition.
mount /dev/sda2 /mnt
Now we can proceed to mount the boot partition.
mount /dev/sda1 /mnt/boot
You may recognize these steps from a manual installation. Now we have nothing left to do but chroot into our user and fix what we need to.
arch-chroot /mnt /bin/bash
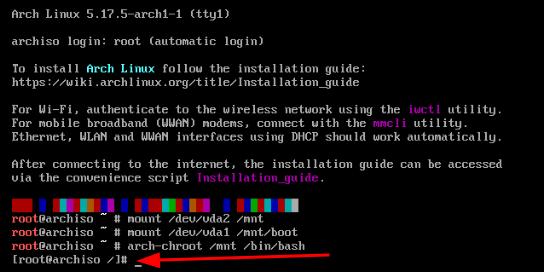
Notice here how you can see your command prompt change to your username.
Common Fixes
Now that you are back on the root user we can fix many of the issues we may be having. We can go ahead and install grub and generate the configuration file like this.
pacman -S grub && grub-install /dev/sda && grub-mkconfig -o /boot/grub/grub.cfg
Note that if you’re booting in legacy this should work just fine to fix grub. If you missed any of the three steps you can run that command on its own. If you are not booting legacy, then you will need to see the commands on the Arch wiki located here. If you botched a DM installation or want to use a console login solution, don’t worry. You will have a chance to fix any mistakes by reversing the changes you made or even trying something new. You might want to log in as a user to make changes for them only. You can do that like this.
su -- username
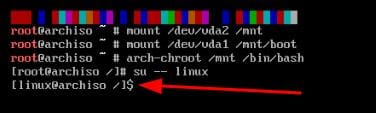
This way you can do changes as you whatever user you replaced ‘username’ with. You will have the option to boot back in with arch-chroot and try again if anything goes wrong. This brings us to kernels. We have a few choices of kernel when installing Arch. Most of us probably use the rolling release kernel. We can choose from hardened, LTS, zen, standard. It is difficult to install a new kernel. It can leave you with a non-boot-able system. So let’s go over it.
Default Kernel
sudo pacman -S linux linux-headers
LTS Kernel
sudo pacman -S linux-lts linux-lts-headers
Zen Kernel
sudo pacman -S linux-zen linux-zen-headers
Hardened Kernel
sudo pacman -S linux-hardened linux-hardened-headers

To ensure that the kernel you select will be available next time we boot you can regenerate your grub like this.
sudo grub-mkconfig -o /boot/grub/grub.cfg
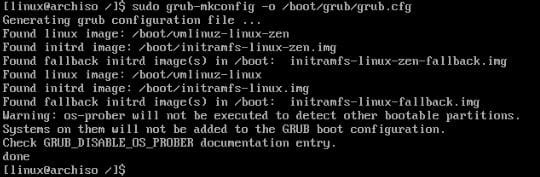
This should give you the option to boot into any kernels you install. Rescuing your Arch installation. Now to exit all, you need to do is this:
exit
That got us out of our user back to the regular arch-chroot on the root user of the machine we are rescuing. Now let’s do that again.
exit
Now we can restart back to a working system if all goes right.
shutdown -r now
So, the next time you install Arch and something is just not working. You can go through what you did wrong and fix it in most cases. Troubleshooting does not always work out. Yet you stand to gain so much knowledge by not backing down and fixing your system. Thanks for reading.